 ..........
The Work Area
Peripheral Equipment
Weighing the Beans
Roasting
Grinding
Pulling the Shot
Steaming the Milk
Cleaning Up
The Finished Product
Rocks in my Coffee
The main purpose of this page is to make some of my experiences in home-brewing high-level espresso available to others who may be a little uncertain about exactly what they are doing--as I have been. Perhaps something I say here will provide some clues that will be of assistance. And, if anyone has any additional clues for me, feel free to email me (mike at this domain).
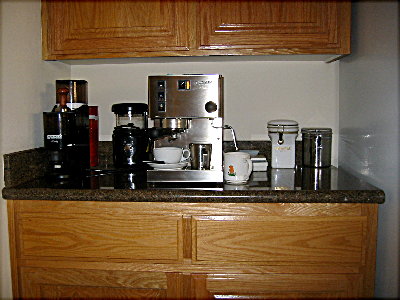
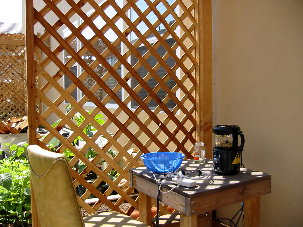
This is my first espresso-brewing work area. The countertop is
granite, and the espresso machine sat out far enough that steam
wasn't really a problem for the cabinets above it. I kept all my
little tools, as well as the roasted and unroasted coffee beans,
in the drawers below. I've moved three times since that photo was
taken, but all of my setups have been similarly laid out.
My original equipment consisted of the Rancilio
Rocky grinder, the Rancilio
Silvia espresso machine, and a Hearthware roaster. I bought the
Rocky and Silvia back in December 2000, based on the
recommendation of Mark Prince. I went through several Hearthware
models, ending with the iRoast 2, which died
I purchased the Rocky, the Silvia, and my first two roasters, from 1st Line Equipment, LLC, and have received excellent technical support on the few occasions when I needed it. I bought the iRoast 2 from Sweet Maria's. Sweet Maria's has already provided wonderful support for that product.
In October 2014, we purchased a small RV -- a class C, with no slideouts. Because of the small size of the "kitchen" counter, along with the relatively large size (and weight) of the Silvia and the Rocky, we went looking for a more compact set-up. After a lot of Googling around, we chose the Breville Barista Express (model BES870XL). The Barista Express is quite light -- especially when the water tank is empty -- and it has a built-in grinder.
Our original plan was to just leave the Barista Express in the RV, and to continue using the Silvia and the Rocky at home. I used the Barista Express at home for two weeks, just to get familiar with it. That was followed by a 5-week road trip in the RV, during which the Barista Express performed flawlessly.
To my surprise, I got far better -- and more consistent --
results with the Barista Express than I had been getting with the
Silvia. I did get some wonderful espresso out of the Silvia, but I
also got some that was almost undrinkable. The effects of ambient
temperature and other factors made it very difficult to get
consistent flavor. It could range from very bitter (too hot) to
sour (not hot enough). On the other hand, the Breville has very
consistent temperature control.
In January 2015, I purchased a Behmor
1600 roaster from Sweet Maria's. It is fairly easy
roaster to use, although I have had to cheat to get my wife's
decaf to the near black, shiny, oily stage that she prefers. I do
this by roasting 12 ounces of beans at the 1 lb. setting. The
company provided excellent support when I needed it.
I started out with a couple of inexpensive espresso machines and matching grinders, purchasing roasted beans at the grocery store. With that setup, I never did figure out how to steam milk, so I ended up just heating my milk in the microwave. Although I used at least enough milk for the result to qualify as a latte, the coffee was bitter enough that I used at least eight level teaspoons of sugar per cup.
After "meeting" Mark Prince on the rec.photo.digital newsgroup, I started reading everything on his CoffeeKid Web site. It took about a year to convince myself that I should spend the big bucks and go for espresso ecstacy. Mark's site really is the place to go to get lots of details and learn the vocabulary. One of the articles on this site that I strongly recommend is the one on "The Basics of Ethical Coffees", by Becky Herndon. I feel that those of us who enjoy coffee enough to spend hundreds of dollars on equipment should not hesitate to support both deserving coffee growers and the ecologies of the countries in which coffee is grown.
Mark also hosts the CoffeeGeek.com site, which includes detailed
user reviews of coffees and equipment (espresso machines, coffee
brewers of all kinds, grinders, even tampers), as well as a
variety of articles on related subjects.
This page used to have a link to Kenneth Davids' Lucid Cafe site.
I've been informed that the site no longer exists, but there is an
interesting article about it: What
Happened to LucidCafe.com? . (Please note that this article
is on the coffeegeek.tv website, which is entirely unrelated to
coffeegeek.com. Don't let this confuse you as it did me when
I first learned of it.)
In addition to depending on Mark's guidance, I purchased David C. Schomer's Espresso Coffee: Professional Techniques, which provided a tremendous amount of detail about how to produce a great cup of espresso. Even though the book is directed at professionals, it contains lots of useful info, including a detailed analysis of how the whole process works.
Almost all my espresso-making techniques come from Prince and Schomer, so I haven't tried to repeat all the details that they provide. I just want to give some other details that might help another beginner.
My main goal has been to get a cappuccino with no detectable bitterness. At first, I didn't really think that it was possible, but now I succeed at least 85-percent of the time. As a result, I've also reduced the amount of sugar to two level teaspoons per cup, and am on the verge of reducing that even further.
One somewhat unfortunate result of my success is that I often have trouble enjoying a cappuccino at a restaurant, because they just don't come up to my new standards. But I guess I can live with that.
 ..........
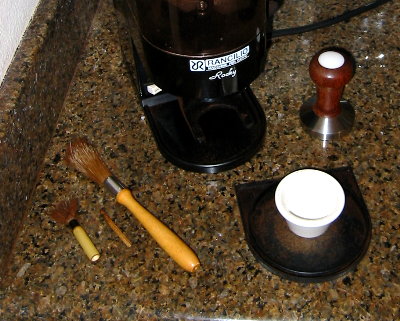
Above are a couple of brushes that I use, a tamper, a holder for the portafilter, and a little sliver of wood, carved from a wooden chopstick, that I use to get the ground coffee out of the grooves in the filter after the first tamping.
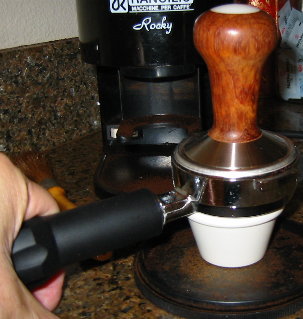
The portafilter holder is actually a little tartar sauce dish that my granddaughter stole from some fast food joint. I use it because my portafilter has a single spout, so it won't sit flat for tamping. The picture on the right shows how I use it. You can see that I used to use the doser lid under my original double-spout portafilter, to keep it off the granite, and it has become scatched up, and actually has coffee embedded in it.
I prefer the single-spout portafilter. I seem to get a better result with it--and it's absolutely necessary for pulling a single straight espresso. I combine it with a La Marzocco double-shot filter, rather than the original Rancilio filter. I'm told that the La Marzocco filter holds about two grams more than the Rancilio filter.
I bought the larger brush; the tamper; a steaming pitcher; a thermometer; espresso, cappuccino, and latte cups and saucers; and shot glasses from Espresso Supply, Inc.
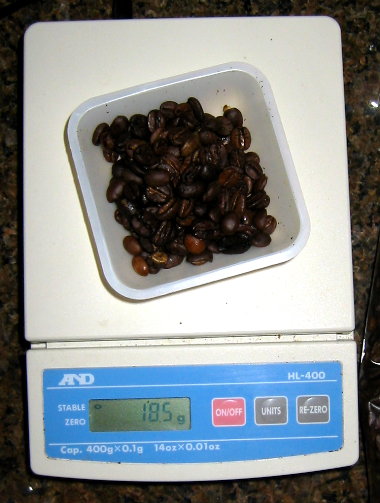
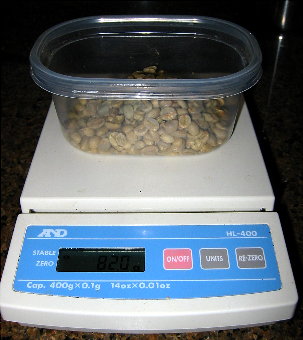
This is the scale that I use to weigh my coffee beans both for roasting and for grinding, the A&D HL-400 from Precision Weighing Balances.
It measures in tenths of a gram, which seems to be the average
weight of a single roasted bean. I notice that lots of folks use
scales that measure in grams, which could lead to a difference of
as many as ten beans from one batch to the next of roasted coffee.
That seems like a lot to me. This particular scale is not cheap,
but it seemed silly to spend something like US$750 on the other
equipment, and then balk at $110 (including shipping) for an
accurate scale.It shuts down automatically if you forget to turn
it off, and the battery seems to last for years.
..........
Here are some beans (Moka Kadir blend, from Sweet Maria's), being weighed for roasting.
I always roast 140.0 grams of beans (just under a cup). Post-roast
weight may be from 10% to 15% lighter. That may not seem like a
very large fluctuation, but it does seem to have a practical
effect on how much coffee is needed for brewing. It may be that
the difference in the degree of roasting also affects how finely
the beans grind at the same setting--and thus how tightly they
tamp. I also like Sweet Maria's Espresso Monkey blend, but not as
much as the Moka Kadir. Espresso Monkey seems to produce a more
consistent roast from bean to bean, and to require a somewhat
shorter roasting time than Moka Kadir. (The beans in the bag
appear much darker than than they really were, by the way.)
Sweet Maria's has a vast selection of green beans, and Tom's
descriptions are extremely thorough. I've never needed to look
anywhere else for my green beans.
The Sweet Maria's site is also a good place to find lots of info about
coffee and coffee roasting. The folks who run this site are
very nice people, by the way, and they care a lot about the small
coffee producers all over the world.
I have used anywhere from 17.0 to 19.5 grams of beans in the La Marzocco double-shot filter, depending on the degree of roast. The longer the beans are roasted, the lighter (in weight, not color) they get--due to water loss, I presume. This means that the darker roasts produce a slightly larger volume of ground coffee per gram. I'm still experimenting to find what works best for different degrees of roast, but when in doubt I just go with 18.2 grams.
 ..........
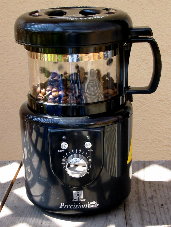
When I lived in Salinas, CA, I did my roasting out on the patio
whenever the weather permitted--which was most of the time. The
above photo shows my first roaster, the Hearthware Precision,
which began acting up after 4.5 years and went to a friend.
In Califonia and, later, Texas, I had ranges with exhaust fans,
so I was able to roast on my stove top, stacking a couple of pots
to get the top of the roaster as close to the exhaust fan as
possible. My North Carolina home doesn't include an exhaust fan,
so I'm roasting out in the garage at present.
I try to follow the degree-of-roast recommendations that come
with all of the green beans from Sweet Maria's. I've recently
added a thermocouple and digital thermometer combo to the iRoast
2. I hope to get pictures up some day, but you can see the
gadgets at Sweet Maria's. It's a fairly easy process, and
I've been very happy with the results, so far. Frankly, I've never
had much success hearing the first and second cracks. The
Hearthwares have all been much too loud. Also, color can vary a
lot among coffee varieties. So, the thermometer seems to add a
degree of consistency to my roasting experiments that they never
had before.
The iRoast cooling cycle does a good enough job that I no longer dump the beans into a colander for additional cooling, as I did with the Precision. I just pour them out onto a kitchen countertop, fan them a bit, and bag them up.
I store the roasted beans in a Ziploc bag. By shaking the beans to the bottom and rolling the bag up before sealing it, I find that I can squeeze out as much air as is possible without using a vacuum device of some kind.
I'm the only cappuccino drinker in my family, and very few of my friends drink coffee at all, so I normally roast once every two or three days, and drink anywhere from one to three cups a day.
Like the Precision, the iRoast is somewhat sensitive both to the
line voltage and to the ambient temperature. I once made the
mistake of plugging the Precision into a very long extension cord
and, instead of the normal 8 min. to 8 min. 45 sec. at a setting
of about 5.5, it took over 10 min. 30 sec. to get even close to
the color I like, and the result tasted terrible. I've also had
very different roast times with the roaster in the kitchen or in
my Salinas garage office. With my current setup, in my North
Carolina garage, the ambient temperature varies quite a bit
between winter and summer. I'm strongly considering building an
exhaust hood indoors to help reduce that factor.
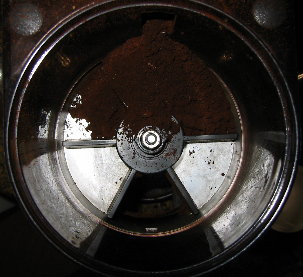
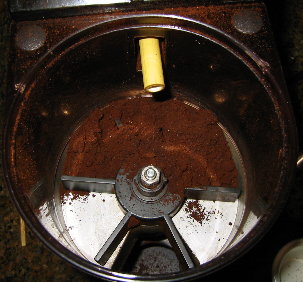
I removed the aluminum cover from the doser blades in the Rocky.
Frankly, the doser seems completely worthless. This is especially
true because I grind just enough for a single cup, so the doser
doesn't fill up. Also, the vanes leave quite a bit of coffee
behind.
 ..........
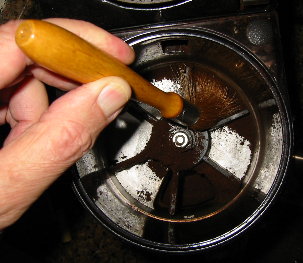
The channel between the bean hopper and the doser is normally full of grounds after I finish grinding. First I scrape out what I can, using the little wooden chopstick sliver, then I use a Japanese paint brush with a cut-off handle to get out the rest of the grounds.
I use a larger brush to actually move the grounds around to where they fall into the portafilter. I normally move the contents of the first two divisions first, smooth them out a bit with my finger, and then move the rest out. When I'm finished, there are no grounds left in the doser. My goal is to grind a precise amount of coffee, and to use every bit of it. I feel that this produces the most consistent results.
My constant use of the brush to move the doser vanes around seems to have caused the doser lever to become disconnected, as it no longer works.
 ..........
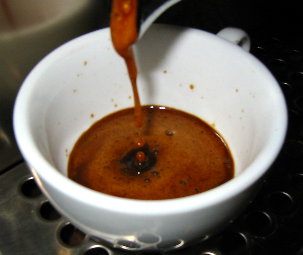
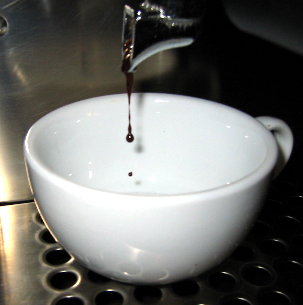
On the left, the pour is just starting. On the right, it's well underway. I seem to get a pretty good amount of crema with my current combination of techniques.
I try for the ideal of having the coffee start coming out of the spout about 8 seconds after I flip the switch, and having it go on for about another 16 seconds. However, I have gotten to the point that I can judge the amount in the cup pretty accurately, so I'm not so dependent on my stopwatch as I used to be. After leaving the Rocky set to 0 for well over a year, I've finally started setting it to -1 for darker roasts and to -2 for lighter roasts, and I'm very happy with the results. The area I live in doesn't seem to produce enough of a variety in the atmospheric humidity to require constantly readjusting the grind.
The worst results come when the grind and tamp haven't worked together, and the coffee comes streaming out within four or five seconds. This tends to happen when I don't grind quite enough beans for a particular roast, so that the tamper hits the inside of the filter before the coffee is thoroughly packed.
Another factor with the Silivia is that the water temperature doesn't seem to get quite hot enough, even after being left on for over 30 minutes. For a while, I turned on the steam switch just before I started weighing out the beans. By the time they were ground and tamped, the temperature was much closer to what's needed for the best results. However, I decided to experiment with timing, and believe that I get a better result if I wait until just before start brushing the ground coffee into the filter. If I get distracted and forget to do this pre-heating, the coffee seems to flow through more quickly, the color is lighter, and the flavor seems weaker. However, the amount of crema produced seems to be inversely proportional to the length of time the steam switch is turned on before pulling the shot--the hotter the water, the less crema. I'm sure there's a happy middle ground, somewhere.
 ..........
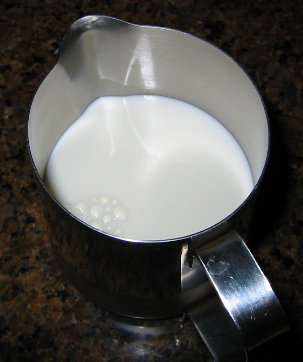
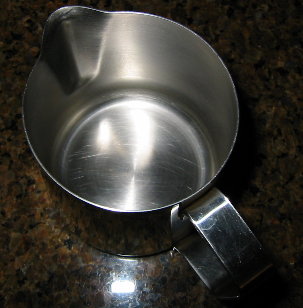
I use a small (16 oz.) stainless steel pitcher for steaming. I
fill it about halfway--to just above the bottom of the spout.
 ..........
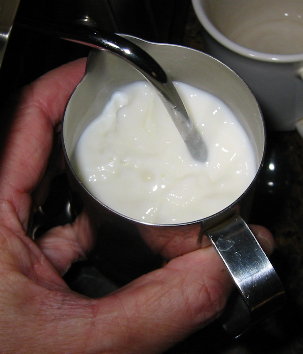
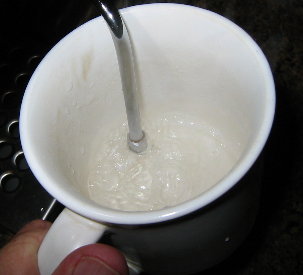
First, I bleed the steam boiler into a large cup, getting the steam fairly dry.
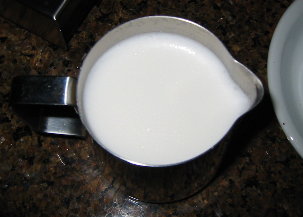
Next, I steam until the milk almost doubles in volume. These photos were all taken holding the camera in my right hand, which is the one I normally use to do everything, so the pictures are not quite accurate.
The ideal result is bubbles that are really too small to be seen. The attainability of this ideal varies with the milk. I use regular vitamin D milk, but as the only serious milk user in my family, I find that as I approach the end of a gallon bottle, it gets harder and harder to get that really fine foam. Forgetting to turn on the steam switch early enough can also cause a problem with just not having a strong enough stream of steam.
 ..........
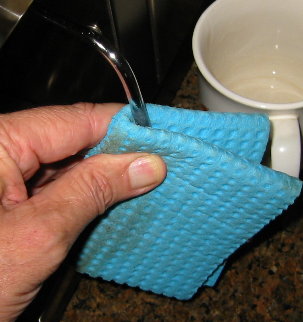
As soon as I finish steaming, I pour the milk into the cappuccino cup, and I then immediately clean off the steamer wand. First I use a wet, but not dripping, sponge cloth to get off all the drying milk. Then, I run some steam into a cup to ensure that there is no milk clogging the wand. Finally, I give it another quick wipe. The cup already has a little water in it, as I always use it to bleed the boiler before steaming.
Because the steam valve is metal, it expands when hot and shrinks when cold. As a result, it may drip a bit after cooling off, so I leave the cup sitting under it all the time, and try to remember to tighten it up a bit later--at least when I turn on the machine again.

Next, I run steam into the large cup for a quick count of ten. The cup is large enough that it fits right under the opening and catches all the steam, so I haven't scalded myself--yet. This cleans off some of the loose grounds that have gotten on the shower head. All this cleaning takes no more than half a minute, but it makes cleaning up later much easier.
I go ahead and drink my cappuccino before doing a more thorough clean-up.
 ..........
On the left, most of the steamed milk has been poured into the espresso. I like to put my sugar into the cup before pulling the shot, then stir a bit as I pour in the steamed milk, so that the sugar is completely dissolved by the time the cup is full.
On the right, a few dollops of white foam have been spooned out of what's left in the steaming pitcher, and dropped onto the top of the cappuccino.
 ..........
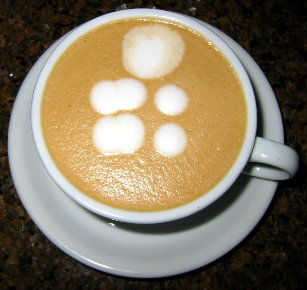
On the left is the result of dragging the handle of a spoon through the foam to create a leaf-like pattern.
On the right is a different pattern, created by dropping the white foam in the center, then dragging out three spiral arms.
The decorations don't add anything to the taste, but they do give you something to look at as you drink. (By the way, I really hate an over-filled cup, because I don't like coffee in my saucer.)
Unfortunately, in this case "rocks" is a noun. After more than 20 months without noting any problems in this area, I got a 20-pound bag of Moka Kadir that contained a few bean-sized rock chips. Fortunately, I normally sit and watch my coffee as it roasts, so during the first roasting from this batch, as the beans darkened, I noticed that there seemed to be a bean that was whiter than any of the others. When the roasting was complete, I watched the beans carefully as I poured them into the collander. Sure enough, there was a little chip of grayish rock. I looked carefully, but didn't find any more. However, I was even more attentive (paranoid) during the next roasting, and found two more little pebbles. These were a bit darker, and I might easily have missed them if I hadn't already had the experience of spotting that first light-colored one.
I have also found pebbles in some Yemeni Mocca Raimi beans. What I suspect is that the Yemeni coffees have so many irregular beans that it's more difficult for the processors to catch all the rock chips--Moka Kadir does contain some Yemeni beans. Now I check before and after roasting each batch, looking especially for unusually dark objects before roasting and for unusually light objects after roasting, and I also look carefully after weighing a batch of beans for grinding. I don't think the Rocky would like those little rocks. So far, I have not found any rocks in any non-Yemeni coffees.
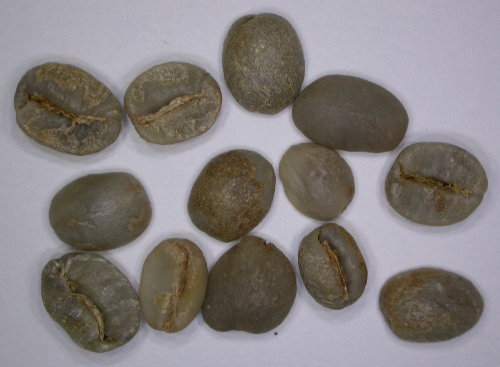
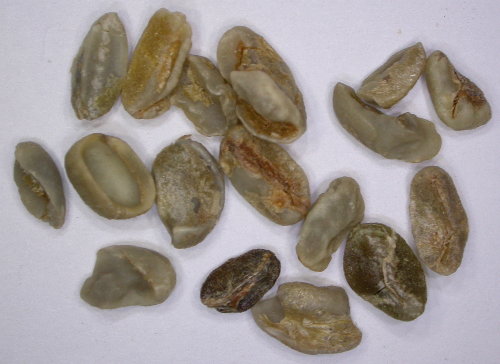
Below are some typical green coffee beans from Monkey blend. Note that they are all pretty regular in shape, and look obviously bean-like.
Below are some odd-shaped beans picked out from a batch of Yemeni Mocca Raimi. You can see that many aren't readily identifiable as coffee beans at all. Often, I can only be sure that one of these little bean chips is coffee by feeling it (green beans have a sort of waxy feel), or by rubbing it on a plate to see if it is abrasive.
Below are some rock chips that I have removed from Moka Kadir and Yemeni Mocca Raimi beans over a couple of months--usually a couple per roaster-load.
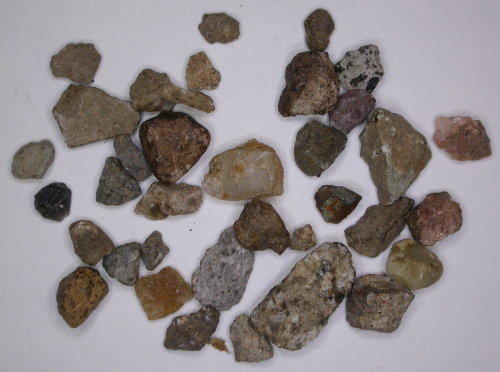
It's not hard to see why the occasional pebble gets through in a
batch of Yemeni beans. (Remember that these shots are blown up
quite large, so the details of the rocks are much more visible
than they would be in real life.) The Sweet Maria's site
on Yemeni coffees explains the cause of this small problem.
It's a bit of a hassle to check for rocks every time, but I
really like the taste that's added by the Yemeni beans, so I'm
willing to put up with it. What I do now is:
1. Spread the green beens on a kitchen counter and rake a dozen
or so into a container, scanning for angular shapes and for
darker-than-normal objects.
2. After roasting, I repeat the process, but concentrate on
lighter-than-normal objects, since beans will darken when roasted,
but rocks will not.
![]() Back to RaccoonBend.com Home
Page
Back to RaccoonBend.com Home
Page