Creating
a
New Datafile
Return to User Guide Index
Note: If you wish to create a new datafile to sync with a copy in iData on a Mac, it is easiest to create the datafile on the Mac. Creating it on the iPhone and transferring it to the Mac for synchronization will take more steps than starting with the Mac.
To create a new datafile in iData Mobile Plus:
1. If a datafile is currently open, close it.
2. Tap the
 button at the bottom
of the Datafiles
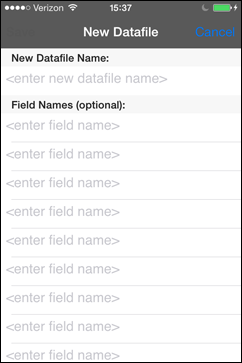
window. This will open the following window:
3. Tap in the white area where it says <enter new datafile name>.
4. Type a name for the datafile. It's generally more convenient to keep iData Mobile Plus datafile names fairly short.
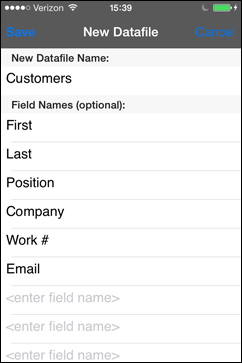
5. If you want fields in this datafile, tap in the first space that says <enter field name> and type the field name. With the keyboard still up, you can tap in the next space to create an additional field. It will scroll the current field area up to the top of the window, hiding previous fields. You can scroll it down to view the other fields, if you wish. Continue entering names into spaces until you have all the fields you want.
If you wish to remove a field name, tap in the field and then tap the
 button in the field to delete the field
content. iData Mobile Plus will ignore empty fields when
creating your new datafile, so it doesn't matter if you
leave an empty one in the middle.
button in the field to delete the field
content. iData Mobile Plus will ignore empty fields when
creating your new datafile, so it doesn't matter if you
leave an empty one in the middle.NOTE: Every datafile automatically includes a large Notes field following the other fields, so you do not have to add that here.
Here's an example of a new field-based datafile:

6. Tap the Done button on the keyboard. If you want to do any further editing, just tap where you want to edit, and the keyboard will come up again.
7. Once the datafile layout is the way you want it, tap the Save button. Your new datafile will be saved to the Private section. Then it will open with one empty record. See the section on Viewing and Editing a Datafile for instructions on adding your data to it.
Here's the example datafile with the single empty record:

|
Deleting
a
Datafile
Return to User Guide Index To delete a datafile: 1. Close any open datafile so that you are looking at the Datafiles list. 2. Tap the  button at the bottom of the
screen. This will bring up a window with a list of
all datafile names, showing a red disk with a white
minus sign to the left of each name. button at the bottom of the
screen. This will bring up a window with a list of
all datafile names, showing a red disk with a white
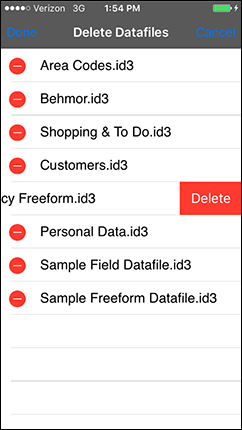
minus sign to the left of each name. 3. Tap on the red disk next to the datafile you wish to delete. The entire line will slide to the left and a red Delete button will appear to the right, as shown below. 4. Make sure that the Delete button is next to the datafile that you wish to delete, as shown below.  5. Tap the Delete button to confirm the deletion of that datafile. At this point, its name will be removed from the list. 6. You can delete as many datafiles as you wish at this time. 7. If you change your mind at any time up to this point, tap the Cancel button in the upper right corner to close this window without deleting any datafiles. 8. When you are through deleting datafiles, and you are satisfield with the list of remaining datafiles, finalize the deletion(s) by tapping the Done button in the upper left corner. WARNING: When you tap the Done button, the deleted datafiles will be deleted immediately, and you will not be able to retrieve them. |
| Return to User Guide Index |