Viewing
& Navigating Datafiles
Return to User Guide Index
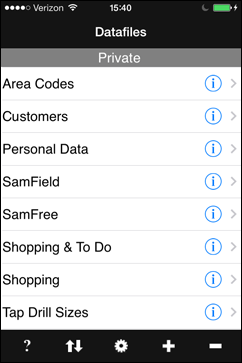
iData Mobile Plus stores newly created or added datafiles in the Private section. When you start iData Mobile Plus, and when you close a datafile or some other window, you will see the Datafiles window, with its list of your datafiles.

To view and/or edit a datafile, just tap its name in the list.
While the datafile is opening, you will see a message like this:

Unless you have a fairly large datafile, it may go by too quickly for you to even see it.
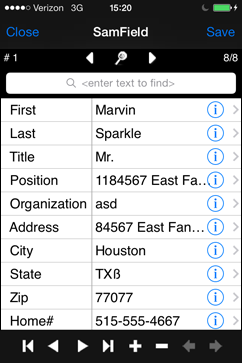
An open freeform datafile looks like this:

At the top of the window is the title bar, with the name of the datafile (Personal Data in the example) in the center, a Close button on the left and a Save button on the right. (When a keyboard is up, the Save button may change to a Done button.)
Below the title bar is the status bar. At the left is the number of the current record (#20 in the example). At the right is number of currently selected records and the total number of records (389/389 in the example). In the center is a cluster of buttons that are used for the record filter and search routines.
At the bottom of the window is the record view toolbar.
The Record View Toolbar Buttons
The toolbar shown in the three images below includes four buttons for moving among records, as follows:
 Go to the first
record.
 Go to the previous
record. If you are already at the first record, this
will take you to the last record.
Go to the previous
record. If you are already at the first record, this
will take you to the last record.You can also perform a one-finger swipe right to left across the record to go to the previous record.
 Go to the next
record. If you are already at the last record, this will
take you to the first record.
Go to the next
record. If you are already at the last record, this will
take you to the first record.You can also perform a one-finger swipe left to left right the record to go to the next record.
 Go to the last
record.
 Add a new record following the
current record.
 Delete the current
record. When you tap this button, you will see a
confirmation dialog saying, "Are you sure you want to
delete this record." At this point, you can tap either Cancel or Delete Current Record.
Delete the current
record. When you tap this button, you will see a
confirmation dialog saying, "Are you sure you want to
delete this record." At this point, you can tap either Cancel or Delete Current Record.Because searching can take you to non-adjacent records, iData Mobile Plus provides a way to navigate forward and backward among previously viewed records.
 Go back through the viewed
record list. If you are at the first record in the list,
this button will be disabled.
 Go forward through
the viewed record list. If you are at the last record in
the list, this button will be disabled.
Go forward through
the viewed record list. If you are at the last record in
the list, this button will be disabled.Viewing Large Field Content
Since there is limited horizontal room for showing large field content, especially on the iPhone, iData Mobile Plus provides a way to view and edit field content in a larger area. This feature also provides a way to treat field content as Web links, email addresses, and phone numbers.
To view field content in a larger area, tap the
 button in a field.
The field content will appear in a Field Content View window that has the field name at the top. In this window, you can tap in the text area and edit the text.
If you make changes and decide not to save them, you can tap the Cancel button in the upper right. Otherwise, tap the OK button to return to the normal record view.
Special Actions in the Field Content View
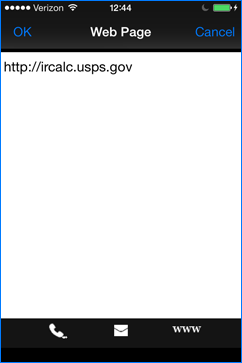
Here is what the field content view might look like if it contained a Web address.

If you tap the
 button, iData Mobile Plus
will attempt to treat the content of the field as a
URL and open it in Safari. When you close Safari and
reopen iData Mobile Plus, it will return to the
record that you were viewing, but not to this
window.
 Similarly, if you tap the
 button, iData Mobile Plus
will attempt to treat the field content as an email
address and send it to Mail.
button, iData Mobile Plus
will attempt to treat the field content as an email
address and send it to Mail.Finally, if you tap the
 button, iData Mobile Plus
will attempt to treat the field content as a
telephone number and will have the iPhone dial it.
button, iData Mobile Plus
will attempt to treat the field content as a
telephone number and will have the iPhone dial it.Note that in cases where telephone numbers are preceded by the tel:// URL prefix, that will be stripped off before dialing, so that tel://828-555-1234 will dial as 828-555-1234.
Needless to say, if you tap a button that is not appropriate to the field content, the button action will not succeed.
Viewing in Landscape Orientation
If you have long lines of text that you want to view without having them wrap to the next line, you may be able to do this in landscape (horizontal) orientation. Here's a field-based datafile that contains some text that's too long to show completely in portrait orientation:

While holding the iPhone vertically, rotate it 90° to the left or right. The result will be something like the following (reduced to fit this window).

Here's an example of a freeform datafile in landscape orientation.

Of course, the actual result depends in part on your having set an appropriate font and point size in Settings.
Note that, in order to maximize the available space the Search bar has been omitted in this orientation in the iPhone version. Therefore, searching must be done in portrait orientation.
Locking the Datafile Screen
In situations where you need to guard against making changes to a datafile, but don't want to close it, you can lock the datafile screen.
The navigation bar of a datafile normally looks like this:

To lock the datafile screen, simply swipe across the screen horizonally -- either left to right, or right to left.
The Save button will change to say LOCKED, and the color will change from blue to yellow. So, it will look like this:

While it is locked, you can perform searches, close the datafile or save the datafile. (Even though the right-side button says LOCKED, it still functions as a Save button.) However, you cannot edit text, and the toolbar buttons will not work.
To unlock the datafile screen, just swipe horizontally again. the right side button will change back to a blue Save button.
This function is especially useful in cases where you want to be able to put your iPhone in your pocket or purse with a record showing, but don't want the text to be accidentally changed.
Saving Changes to a Datafile
You can save changes to a datafile at any time by tapping the Save button in the record view.
Also, if you do not have the Auto-Save Changes setting turned on in iData Mobile Plus Settings, when you close a datafile to which changes have been made, you will be given options to Save Changes, Discard Changes, or Cancel.