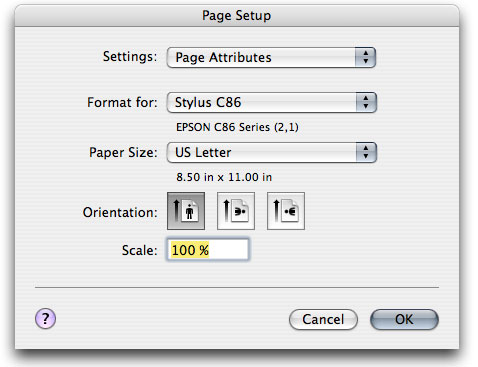
When you create a new label template, the Edit Page and Page Setup dialog windows will appear automatically with the new template window. To change the size and layout of labels on an existing template, click the Edit Page icon in the template's toolbar. A drop-down sheet will open.
The first order of business is to make the proper settings in Page Setup. If the Page Setup window is not already open, click the Page Setup... button on the Edit Page window.
The Page Setup settings should reflect the overall size of the page your labels are on. In the USA, Avery labels will be on a US Letter size sheet.

Once the Page Setup is set correctly, the layout of labels can be edited.
Label Size
The top area of numbers refers to the individual label size, and the number of labels on the sheet. This information can usually be read off of the label package. The mock-up page image on the left will reflect changes to the settings when you tab to the next setting box.
If you wish to use metric measurements, click the Centimeters radio button at the bottom of the window.

Label Spacing
The middle area is for the spacing between labels. The Vertical spacing is the space between columns of labels in the center of the page. If the labels butt up against each other, 0.000 is the correct measurement. The Horizontal spacing is the space between rows in the center of the page.
Margins
The Top margin is the space from the edge of the page to the edge of the top label. The top edge feeds into the printer first on most printers. The Bottom margin will be calculated automatically, based on the top margin, label height, and vertical spacing. If it does not come out right, there is probably an error in one of your other measurements.
The Left margin is the distance between the left edge of the page and the left edge of a label in the left column. The Right margin will be calculated, based on the left margin, label width, and horizontal spacing.
When all the numbers are set, see if the mock-up on the left looks correct. If so, click the OK button. The template window should look like a page of the labels you are working with.
Testing the Layout
You can see if your settings match your actual labels by printing the template using the Print Test Sheet... command (in the Print sub-menu, under the File menu) on plain paper. This will print black lines where the edges of the labels should be. Lay the printed page on a blank sheet of labels and hold them up to a light source. You should be able to see whether the label edges line up with the lines on the test sheet. You can, of course, print a test sheet on an actual sheet of labels, but that can get expensive if you are having difficulty getting it just right.