via WiFi
iData Pro provides two methods for
synchronizing datafiles on the Mac with datafiles in iData
Mobile Plus on the iPhone, iPod Touch, and iPad. (To keep things
simple, we will just refer to the iPhone below.)
The simplest method is via a local WiFi network, created using a wireless router, such as Airport Extreme. This is the method of choice for a single individual who just needs to keep datafiles on both platforms in sync.
The Mac and the iPhone must both be
on the same WiFi network.
Creating a New Sync File on the iPhone Over a Local WiFi Network
A datafile that was created on the Mac must first be moved to the iPhone using the Save As New Sync File function.1. Open iData Mobile Plus on the iPhone. Be sure that WiFi is turned on, and a WiFi network is selected in the iPhone Settings application.
2. Tap the  icon in the toolbar at the bottom of the Datafiles
window.
3. In the next
window, tap the WiFi
Synchronization button. This will bring up the
following window.
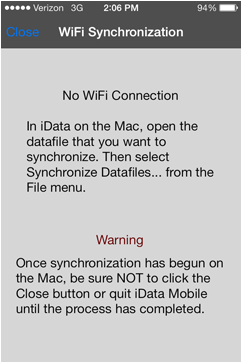
4. Note that the
top line in this window says, "No WiFi Connection". If you see
this line, it means that your iPhone does not have a good WiFi
connection. Once the WiFi connection is good, you will see that
it now says "Starting Connection". At that point, you can
proceed with synchronization.
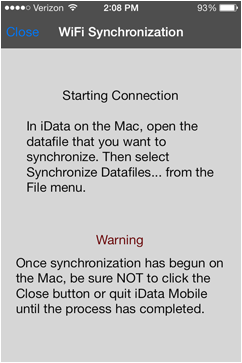
5. Leave this
window open until you finish creating your sync file. (You can
create as many sync files as you wish while this window remains
open.)
6.
Open
the datafile to be synced in iData Pro. If this is a datafile
that does not already contain a Sync ID, iData Pro will assume
that you want to create a sync file to match it.
NOTE
1: This datafile must be in the correct format, as
explained in the NOTE above.
NOTE
2: Memory is extremely limited on the iPhone. We
strongly recommend that you do not try to use datafiles any
larger than 5 MB in size. If you start to create a sync file
that is larger that 5 MB, you will see a warning notice, and
will have a chance to cancel the process. Then you can try to
reduce the size of the datafile. iData Pro provides a function
to split a datafile into two smaller datafiles, but if you are
creating datafiles from scratch, you are probably better off
just being careful not to exceed this file size.
7.
Choose
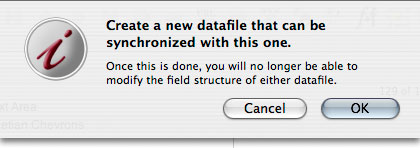
Save As New Sync File... from the File menu, read the text in the
dialog sheet that comes up, and click the OK button.
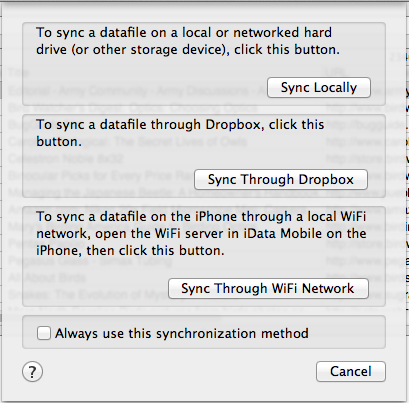
8. Next you will be asked how you want to create the sync file. When the following dialog appears, you can enable the Always use this synchronization method checkbox to avoid this dialog in the future. (This option can be changed at any time in the Special tab of the iData Pro Preferences dialog.)
10. If you have multiple active WiFi devices, you may see the following dialog. In it, select your iPhone, then click the OK button.

NOTE iData will remember the name of the iPhone that you select, and will use it in the future if it is available. If it is not available, this dialog will appear again.
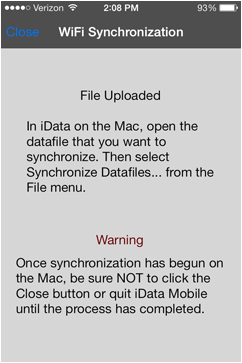
Synchronizing a Pair of Sync Files Over the WiFi Network
Once a sync file has been created on the iPhone,
you can make changes to it and/or to the original on the Mac.
When you want to get both datafiles to match again, you can
perform synchronization. The process is very similar to what
you did to create the sync file in the first place.
1. Open iData Mobile Plus on the
iPhone. Be sure that WiFi is turned on, and a WiFi network is
selected in the iPhone Settings application.
2.
Tap the  icon in the toolbar at
the bottom of the Datafiles window.
3.
In the next window, tap the WiFi
Synchronization button. This will bring up the
following window.

4.
Note the address beginning with http at the bottom of the
window. As explained in the previous section, if this window
says "No WiFi Connection, you will have to make sure that you
have a good WiFi connection before proceeding.
5.
Leave this window open until you finish syncing on the Mac
side. (You can synchronize as many datafiles as you wish while
this window remains open.)
Note: If the current (frontmost) datafile does not have a Sync ID, then both the Synchronize Datafiles... and Remove Sync ID... items under the File menu will be disabled.
7. Choose Synchronize Datafiles... from the File menu. When the following dialog appears, click the Sync Through WiFi Network button.

