The preference settings affect all datafiles.
The Dialing Preferences window lets you create dialing sets. It also lets you specify a character for bracketing phone numbers, to make it easy for iData Pro to find them.
In addition, it allows you to select one of three dialing methods -- FaceTime, speaker (tone) dialing, and modem dialing. These methods are explained below.
Dialing Sets
Dialing sets are named sets of prefixes and/or suffixes that can be added to a telephone number when it is dialed. A typical example is that you might have a number, such as 512-555-1234 in a datafile record. Instead of having to type a 1 in front of it before dialing, you can create a dialing set that automatically adds a 1 in front of any number that it is used to dial.
A dialing set consists of three elements:
1. A set name, used strictly for identification purposes. This is how you select the set in the Dial menus.
2. An optional prefix -- consisting of one or more characters to be dialed before the main number.
3. An optional suffix -- consisting of one or more characters to be dialed after the main number.
iData Pro has one permanent dialing set, Basic, which cannot be deleted. This dialing set does not add either a prefix or a suffix. In other words, it just dials the main number.
Phone Number Bracketing Character
iData Pro has three ways of identifying a phone number to be dialed. The first, which take priority, is highlighted text. If you tell iData to dial the phone, and there is some active highlighted text, that is what iData will send to the modem for dialing.
If there is no active highlighted text, and if you enabled this preference in the following dialog, iData will start scanning the current record, looking for some text starting and ending with the specified character (a "bracket"). Once you have picked a bracketing character, you can type it before and after phone number. This is particularly useful in the Freeform Text Area, where it may be hard to spot a phone number in a large block of text--even if you know that it's there.
Finally, if iData can't find either
a highlighted number or a bracketed number, it will look for a
number that fits one of the Telephone Number
Templates, as explained below.
The Dialing Preference Window
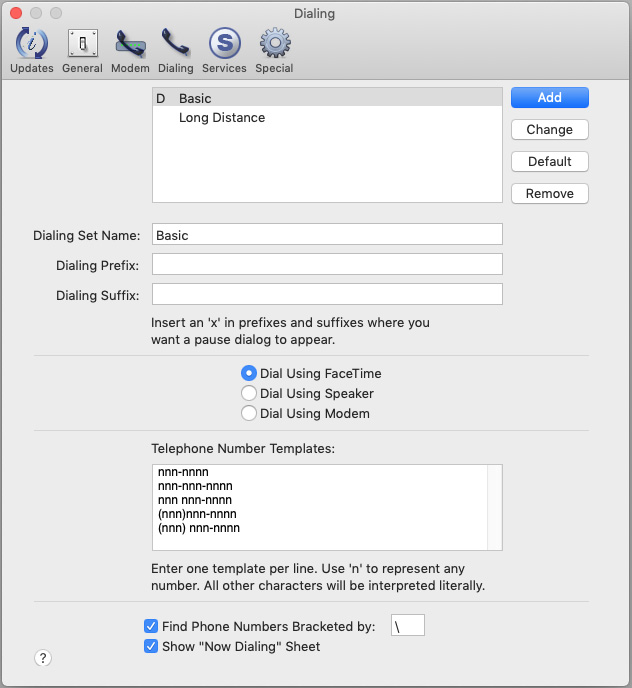
The first time the Dialing preference window is opened, it will look like this:

Creating a New Dialing Set
To create a new dialing set, just type in a meaningful name--one that you can remember a month later--and any desired prefix and/or suffix characters. In addition to numbers, your prefixes and suffixes can include commas (which will cause a 2-second pause), the # (pound sign), * (asterisk), and the letter x.
The letter x will cause a pause dialog to appear, allowing you to wait for a prompt before continuing to dial the number. When you are ready for the next number to be dialed, you just click a button--as explained below. This is useful when you have to dial a prefix and wait for a second dial tone before dialing your main number.
When you are satisfied with your dialing set, click the Add button.
When you click on a dialing set in the list, its name, prefix, and suffix will appear in the text fields below. At that time, you can delete the set by clicking the Remove button. You can also change anything about that set and click the Change button.
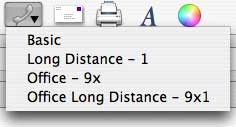
iData provides command-D as a keyboard shortcut for dialing. By default, this command key applies to the Basic dialing set, but you can change it to apply to the set that you use the most. All other dialing sets must be selected either from the Dial sub-menu, under the Tools menu, or from the popup menu on the toolbar, as shown below

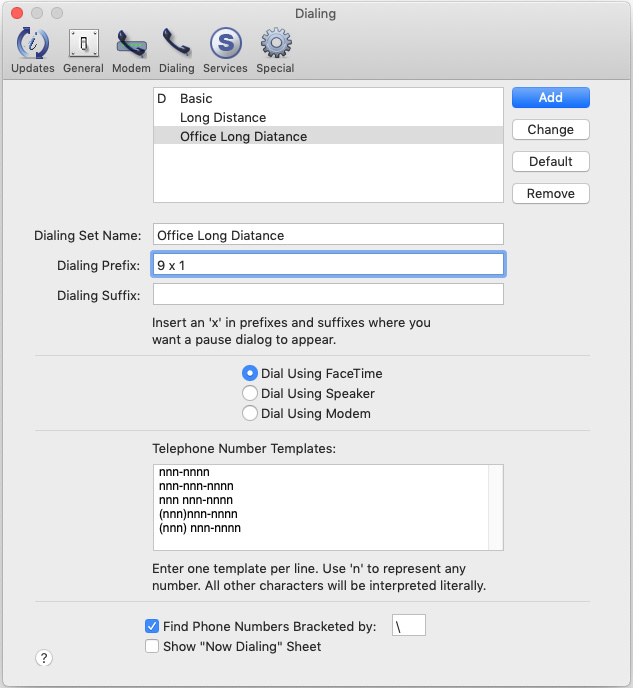
Here is a typical group of dialing sets (which show up in the above popup menu):

In the above example, you can note the following points:
1. The set names include both a descriptive word or two, and an indication of the set prefix.
2. The two Office sets start with a number 9, used to get an outside line in some offices, followed by the letter x, which will cause a pause sheet to come up and wait for you to click a button before continuing to dial the number.
3. The set to which command-D applies is the usually the Basic set. You can change your default set to the set you use the most. To do so, select the set name in the list and click the Default button. A "D" will appear next to the default set name in the list.
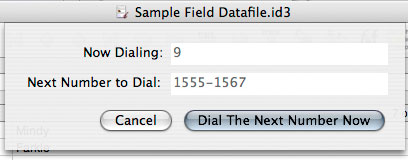
Here's what the pause sheet would look like using the Office - 9x set to dial a number:

Once the 9 had been dialed, and a dial tone appeared, clicking the Dial The Next Number Now button would cause iData Pro to dial 555-4569.
This use of the letter x to bring up a pause dialog is referred to as "extension dialing", and there is no limit to how many such number segments can be strung together this way. The "extension dialing" x can be used in prefixes, suffixes and in the phone number itself. Extension dialing works both with bracketed phone numbers and with highlighted phone numbers, as long as the extentions are all included within the brackets or highlighting.
NOTE:
Extension dialing cannot be used with FaceTime.
A
Real-life Example
As an example of combining bracketing with extension dialing, you might be able to use something like the following to order a prescription from your drugstore:
\555-1234 x 1 x 1 x 1234567890 x 1 x 2 x 555-3456 x 1\
Here's how the dialing of this number might go (with "the button" used to mean the Dial The Next Number Now button):
1. First iData would dial the drugstore automated prescription line: 555-1234
2. When you hear "To continue in English, press 1", click the button to dial 1
3. When you hear "To order a prescription, press 1", click the button to dial 1
4. When you hear "Please enter your ten-digit prescription number", click the button to dial 1234567890
5. When you hear "The number you entered is 1234567890. If this is correct, press 1", click the button to dial 1
6. When you hear, "If you would like to order more prescriptions, press 1, if not, press 2", click the button to dial 2
7. When you hear, "For verification purposes, please enter your seven-digit phone number", click the button to dial 555-3456
8. When you hear, "You entered 555-3456. If this is correct, press 1", click the button to dial 1.
9. When you hear, "Your prescription will be ready Friday afternoon", hang up.
Except for the precise details,
this is something that both members of iData Partners use
iData for on a regular basis. iData makes it easy to enter all
these details without error. At each step of the way, you will
see the number that has just been dialed and the next number
to be dialed, so you know exactly where you are in the
sequence. At any point, you can also click the Cancel button and take up dialing by
hand, or just hang up.
(Note that you may include spaces
in a bracketed or highlighted number for clarity. They will be
ignored in the dialing process.)
Dialing Using FaceTime
iData can dial your telephone
using FaceTime. Note that FaceTime cannot perform extension
dialing.
Setting up the Mac, iPhone, and FaceTime to Work Together
See the full Continuity article from Apple.Use iPhone Cellular Calls with any Mac, iPhone, iPad, or iPod touch that meets the Continuity system requirements. It works when your devices are near each other and set up as follows:
- Each device is signed in to iCloud with the same Apple ID.
- Each device is signed in to FaceTime with the same Apple ID.
- Each device has WiFi turned on.
- Each device is connected to the same network using WiFi or Ethernet.
- On iPhone, go to Settings > Phone > Calls on Other Devices, then turn on Allow Calls on Other Devices.
- On iPad or iPod touch, go to Settings > FaceTime, then turn on Calls from iPhone.
- On Mac, open the FaceTime app, then choose FaceTime > Preferences. Click Settings, then select Calls From iPhone.
To have iData Pro attempt to dial using FaceTime, select the Dial Using FaceTime radio button in the Dialing preferences dialog. Then use the Dial menu or toolbar button to have iData Pro dial the number.
When you Use the Dial menu or
toolbar button to have iData Pro dial a number, you will see
something like the following in the upper right corner of the
screen. Click the Call button to initiate the call.


In addition to having iData Pro recognize telephone numbers and dial them using the Dial menu or the toolbar button, you can create clickable telephone links that will allow you to initiate telephone calls through FaceTime. Read about this here.
Dialing
Using Speaker Tones
Speaker dialing involves iData Pro generating dial tones through the computer speaker system. It requires a landline and a telephone that can respond dial tones.
To use speaker dialing, select the
Dial Using Speaker radio button in the Dialing preferences
dialog. Note that some telephones, including cellphones,
either do not use true tone dialing, or do not permit the
playing of dialing tones into the earpiece.
To use speaker dialing:
1. Activate your telephone by lifting the handset or turning it on, as appropriate.
2. Hold the earpiece as close as possible to the speaker.
3. Use the Dial menu or toolbar button to have iData Pro dial the number.
If your telephone has a problem with this procedure, you need to experiment with different speaker volumes.
Dialing Using a Modem
Modem dialing requires a landline and a compatible modem.
To use modem dialing, select the Dial Using Modem radio button in the Dialing preferences dialog. See the Modem Preferences help page for information on setting up your modem to dial the phone.
Once the modem is set up and turned on, use the Dial menu or toolbar button to have iData Pro dial the number.
Telephone
Number
Templates:
Note: It is best not to use commas as number separators, because most modems use commas as signals to insert a two-second delay in the dialing stream.
The Telephone Number Templates: box is a simple text field. Place each template pattern on its own line, using the letter 'n' to represent numbers, and typing the actual non-numeric characters that you use to divide up your telephone numbers. The order in which the template patterns appear in the box does not matter, as long as each one is on its own line.
Note: Because iData searches for numbers that match your telephone number templates, there is no way for it to handle extension dialing, as explained above. If you wish to do extension dialing, you will have to either bracket or highlight the number-extension(s) combination.
Find
Phone
Numbers Bracketed by:
If this option is selected, the single character in the text box at the right can be placed on each side of (before and after) phone numbers in your datafiles, and iData then be able to identify them as such. The default, as shown, is the \ (backslash). You should select a character that isn't likely to occur in pairs in your datafile content.
This feature is most useful if you have a record that contains several phone numbers, but there is one that you almost always dial. (Whenever you want to dial one of the unbracketed numbers, you can highlight (select) that number, which will cause it to be chosen for dialing.)Show
"Now
Dialing" Sheet
How
iData
Decides What to Dial
If there is no selected text, and if you have selected the Find Phone Numbers Bracketed by: option, iData scans the record text, starting from the insertion point, for a phone number that is bracketed by the bracketing character that you have specified. If it finds such a bracketed number, it sends that number to be dialed. If no bracketed number is found between the insertion point and the end of the record, the search for a bracketed number will wrap from the beginning of the record. Bracketing is a good way of getting iData to dial a particular number in a record that contains more than one valid phone number.
Finally, if there is no selected text and no bracketed number, iData begins scanning from the current text insertion point, and dials the first number it finds that matches one of your templates. If no valid number is found between the insertion point and the end of the record, the search for a matching number will wrap from the beginning of the record.