Sum the Contents of Selected Fields... (Return to top)
This command adds a simple
spreadsheet-like ability to total the contents of one or more
fields (columns in List View).
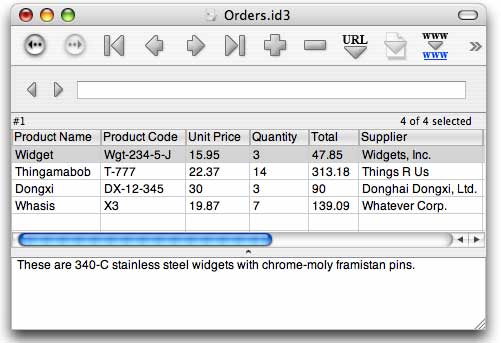
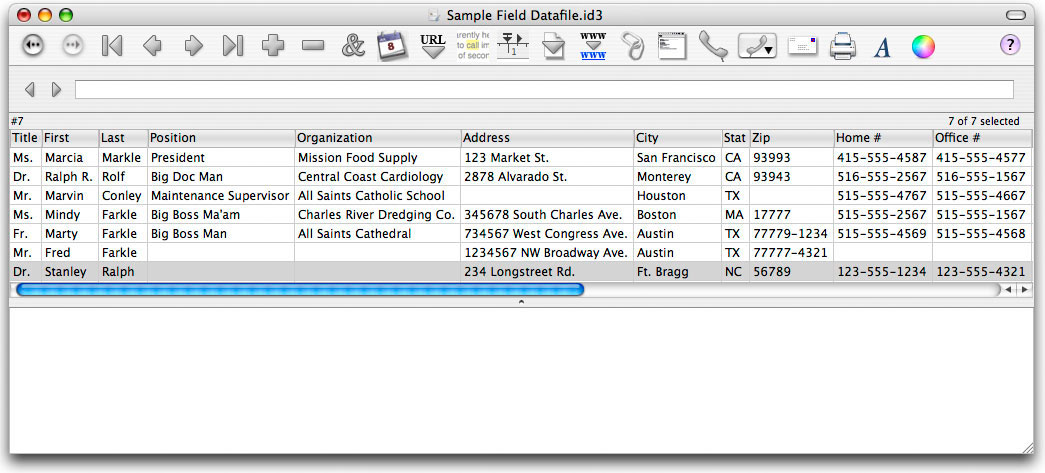
First, open a datafile that contains
numbers in one or more fields, such as this one:
Next, select Sum the Contents of Selected
Fields... in the Fields sub-menu, under the
Edit menu, to
bring up this dialog:
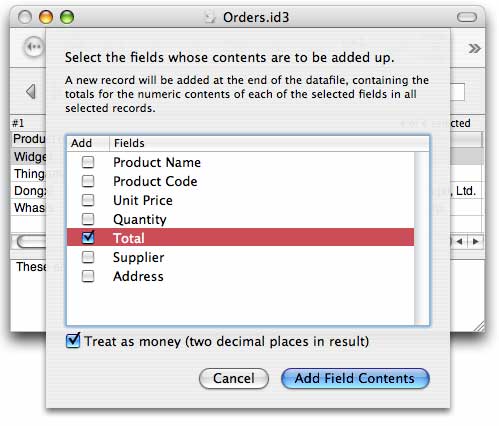
Enable
the
checkbox next to each field that you want to total. You may
total any number of fields in a single operation.
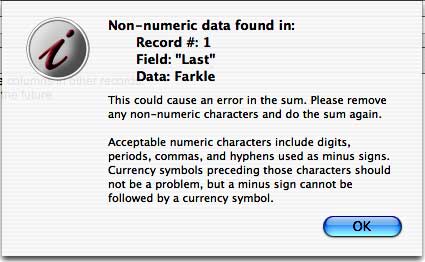
If
you select fields that contain non-numeric data, a warning
notice like the following will appear:
If
you are dealing with money, enable the Treat as money (two decimal
places in result) checkbox.
Click
the
Add Field Contents
button. A new record will be added at the end of the datafile,
with each selected field containing a total of the contents of
that field in all other records. In our example, the result
looks like this:
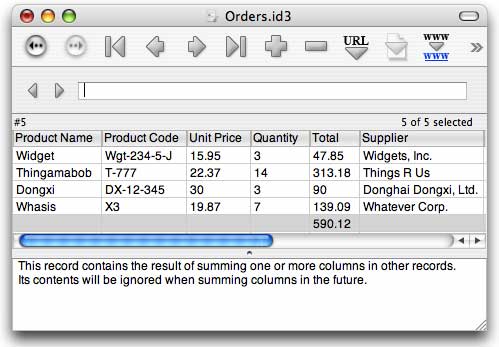
The Freeform Text Area of the new
record will contain text saying "This record contains the
result of summing one or more columns in other records. Its
contents will be ignored when summing columns in the future."
Create New Field w/Content... (Return to top)
This command lets you add a new
field with either static content (the same in every record) or
sequential numeric values in every record.
Select Create New Field w/Content... in the Fields sub-menu, under the Edit menu, to bring up this dialog:
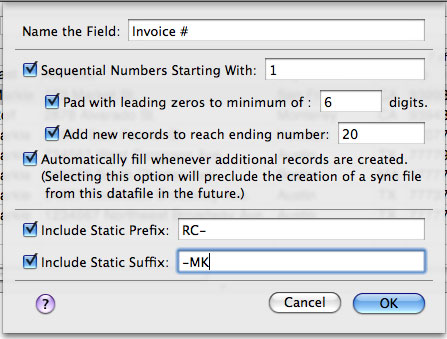
First, type a name for the new field
in the Name the Field:
text box.
To have the new field filled with
sequential numbers, enable the Sequential
Numbers
Starting With: checkbox and type a starting number into
the text box next to it.
With that checkbox enabled, select
the Pad with Leading Zeros
checkbox to force all number entries to have the same number of
digits by adding leading zeros where necessary.
Also, to have as many new records
added as needed to reach a particular number, select the Add new records to reach ending
number: checkbox and type an ending number in the text
box next to it. If this number is less than or equal to the
number of records already in the datafile, none will be added.
To have iData Pro automatically keep
track of the sequential numbers that have already been used, and
to have it fill in the field with the next available number each
time a new record is created, selet the Automatically fill whenever
additional records are created. checkbox. Only one
field can have this option set for it. Also, because having
versions of the same datafile on two different computers could
result in the creation of different records with some of the
same values in this field, it will not be possible to create a
sync file from a datafile that has this option set.
To have each number preceded by some
unchanging prefix, enable the Include
Static
Prefix: checkbox and type the desired prefix into the
text box next to it. If you desire only a piece of static text
in each record, use this checkbox and leave the other checkboxes
disabled.
To have each number followed by some
unchanging suffix, enable the Include
Static
Suffix: checkbox and type the desired suffix into the
text box next to it.
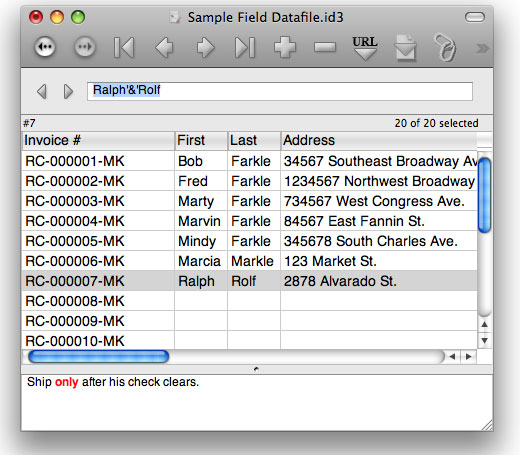
In our example, the result looks
like this:
Move Current Freeform Text into Fields (Return to top)
This command moves the first line of
text from the Freeform Text Area of the current record into the
first field of that record, the second line into the second
field, and so on, for as many lines of text and fields exist.
The purpose of this command is to assist you in moving blocks of
text, such as address blocks, into fields. Since iData Pro
doesn't have any way of matching text to field names, it is up
to you to structure your text to match the field structure of
your datafile. In the following example, an address block has
been broken down to match the field structure.
Before performing this operation, you should make sure that any desired changes to the datafile have been saved. This will permit you to return the datafile to its previous state by using the Revert to Saved option, in case you are not satisfied with the results.
If the Freeform Text Area contains
more lines of text than there are fields, the excess text will
remain in the Freeform Text Area.
Here is the datafile with an address
block pasted into the Freefrom Text Area of a new record. Note
that the fields are all empty.
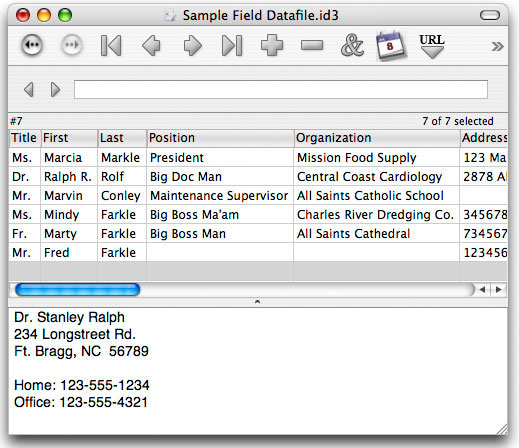
Here it is with the address
rearranged to match the field structure of the datafile. In
particular, note that two blank lines have been left where
Position and Organization data would normally appear.
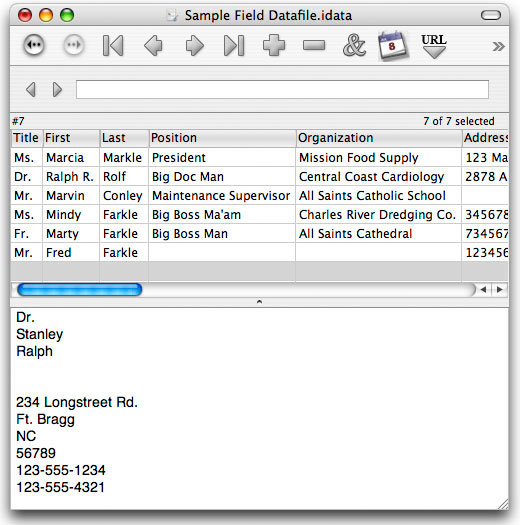
Here is the result of moving the
data into the fields.
Move Freeform Text of Selected Records into Fields (Return to top)
This command works like the previous command,
but affects all records in the datafile. Before executing this
command, you should save any changes so that you can revert the
datafile, or close it without saving changes, if the results are
not exactly as you anticipated. This can be useful for
converting a freeform datafile into a field-based datafile. In
that case, plan your field structure to match your data as
closely as possible, in order to minimize the need to rearrange
the record text. For example, you might want to have a single
Name field and a single City, State, Zip field. Use the Modify Fields command
(below) to add the new fields.
Transfer Text Elements into Fields (Return to top)
This command can copy or move phone
numbers, email addresses, and/or Web links from the Freeform
Text Area of every record into newly created fields. This is
particularly useful if you want to be able to dial those phone
numbers or open those email and Web links in iData Mobile. It
can also be useful if you need to convert a freeform-only
datafile to field-based, so that it can be exported in
tab-delimited format.
NOTE: Because this command can
produce significant structural changes that can only be undone
by reverting to the saved version of the datafile (by selecting
Revert to Saved under
the File menu), we
strongly suggest that you make a backup copy of your datafile
before using it.
This command will bring up the
following dialog:
![]()
1. In the first section, enable the
checkbox for each type of item that you want to transfer. You
can do all three at once, if you wish.
2. In the second section, specify
whether you want to transfer only the first of each type of item
found in each record, or if you want to transfer all such items.
If you select the first option, fields named Phone, Email, and Web Link will be created, as
needed. If you select the second option, field names will have
numbers appended, as needed, e.g., Phone 1, Phone
2, Phone 3,
etc. Once the transfer is completed, you can rename those fields
using the Modify Fields command.
You can also rearrange them in the Modify Fields dialog. Note
that the second option may result in a surprisingly large number
of new fields--for example, if even one record contains 20 phone
numbers, the result will be fields Phone 1 through Phone 20 to accomodate them.
3. In the third section, specify
whether you want to copy the items to fields, leaving the
originals in the Freeform Text Area, or to remove them from the
Freeform Text Area after copying them to the fields. The first
option may be desirable if you just want to have the items
available for dialing or linking in iData Mobile. However, if
you use this command more than once with the Copy the items option
selected, you will end up with multiple fields containing
identical data.
Click OK to execute the command. Copying items is a
fairly rapid process, but moving items requires displaying each
record in turn, so a large datafile with lots of items to be
moved may require several seconds to finish.
Before saving changes, look over the
datafile and make sure that the results are what you
anticipated. If not, you can Revert to Saved and try a different
approach.
Fill in Empty Fields (Return to top)
Sometimes it is useful to be able to fill a specified field with a particular piece of text without changing any existing field content.
Before performing this operation,
you should make sure that any desired changes to the datafile
have been saved. This will permit you to return the datafile to
its previous state by using the Revert to Saved option, in case you are not
satisfied with the results.
This command will bring up the
following dialog.
Select a field in the Fill this field when empty:
popup menu, type the desired text in the With the following text:
text field, and click the Fill
Empty Fields button. The text will be placed in the
specified field in all selected records in which that field is
empty.
Replace Field Content (Return to top)
iData Pro also provides a command to
fill a specified field with a particular piece of text--even if
the field is not empty.
Before performing this operation,
you should make sure that any desired changes to the datafile
have been saved. This will permit you to return the datafile to
its previous state by using the Revert to Saved option, in case you are not
satisfied with the results.
This command will bring up the
following dialog.
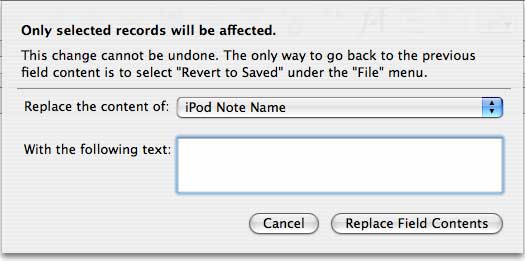
Select a field in the Replace the content of:
popup menu, type the desired text in the With the following text:
text field, and click the Replace
Field Contents button. The text will be placed in the
specified field in all selected records in which that field is
empty.
Transfer Field Content to Freeform Text Area... (Return to top)
iData Pro provides a command to copy
or move content from a specified field to the Freeform Text Area
(FTA). The field content can be placed at the beginning or end
of any text already in the FTA, separated from that content by a
space, a return, or a blank line.
Before performing this operation, you should make sure that any desired changes to the datafile have been saved. This will permit you to return the datafile to its previous state by using the Revert to Saved option, in case you are not satisfied with the results.
Select Transfer Field Content to Freeform Text Area...
in the Fields sub-menu,
under the Edit menu, to
bring up this dialog:
![]()
First, select a field in the Transfer the content of: popup menu.
If you do not want to remove the transferred text from the field, select the Copy the field content to the Freeform Text Area radio button. Otherwise, select the Move the field content to the Freeform Text Area radio button.
Select a radio button under Place the transferred field content:, and click the Transfer Field Content button.
iData Pro will ignore records in which the specified field is empty.
The Modify Fields dialog is for managing the field structure of a datafile. You can add fields, delete fields, rename fields, rearrange the order of fields, and set which fields show in List view.
NOTE: If the datafile has a Sync ID, you
will not be able to modify its field structure by inserting or
deleting fields, since it would then have a field structure
different from the remote datafile that was created to sync with
it. However, you can still change the order of fields and change
whether any particular field is shown. If you need to change the
field structure a synchronized datafile, see the User Guide
article on Modifying Fields in a Synced Datafile.
Before performing this operation, you should make sure that any desired changes to the datafile have been saved. This will permit you to return the datafile to its previous state by using the Revert to Saved option, in case you are not satisfied with the results.
Select Modify Fields... in the Fields sub-menu, under the Edit menu, to bring up this dialog:
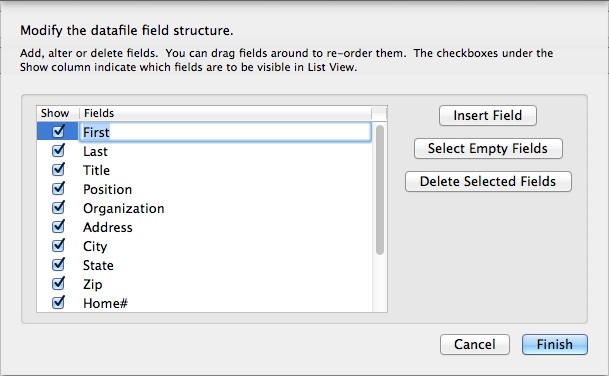
The checkboxes in the Show column determine which fields will show as columns in List View. If a box is checked, its field will show in List View. Otherwise, it will not show in List View, but will still exist and can be set to show again by re-checking its box in the Show column..
If no boxes are checked, only the first line of the Freeform Text Area will show as a column in List View.
Click on a field name to highlight it. Once highlighted in the Field Name column, the name can be edited, or the entire field can be deleted. If you delete a field that contains data, the data in that field will be lost. The command key for the Delete Field button is command-D.
To add a new field, click on the Insert Field button. A field will be added with the title "New Field" highlighted. Simply type the title you wish for that field. The command key for the Insert Field button is command-I.
The order of fields can be rearranged by dragging and dropping field names in this dialog. Just click on a field name and drag it to its new position relative to the other fields.
If you believe that some fields are not being used, you can click the Select Empty Fields button, and any fields that do not contain text in any records will be selected. Then you can either hide them or delete them.When you are satisfied with the field settings, click the Finish button (or type command-return).
Note that you can even add fields to
a datafile that was created with no fields at all. The
distinction between field-based and freeform datafiles is not as
final as it was earlier versions of iData and InfoGenie.