iData has a Datafile Settings
window with four tabs, one for each Settings category.
(Note: These settings are made
individually for each datafile. Settings are distinguished
from iData Pro Preferences, which apply to iData Pro as a
whole.)
General Settings
Always Settings
Format Settings
Web Address Settings
Address Block Settings
General Settings: (return to top)
1. With a datafile open, select Datafile Settings...
from the File menu. (Or, type command-option-comma.)
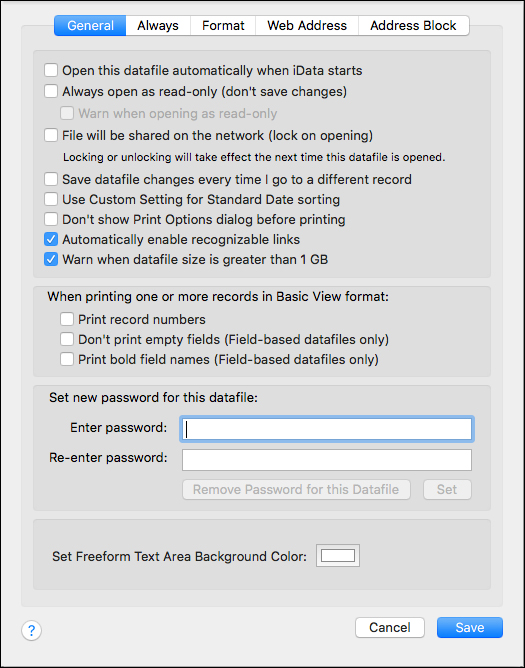
2. In the dialog that comes up, select the General tab. It should look like this:
3. Once you've made your settings, click the Save button to make those changes take effect.
What the General Settings Mean
Open this datafile automatically when iData starts
Enable this checkbox to have the current datafile open each time you launch iData Pro. This is most suitable for datafiles that you use all the time. For example, if you do a lot of Web surfing, you might want to have your Bookmarks datafile always available for grabbing Web addresses.
Always open as read-only (don't save changes)
This option is designed for the user who need access to the datafile, but who should not make changes to it.
Warn when opening as read-only
This option is only available if the preceding option is enabled. It is designed to remind you that any changes you make to a read-only datafile will not be saved, so that you don't waste your time editing records.
File will be shared on the network (lock on opening)
In order to make iData Pro as fast as possible, it reads all of each datafile into memory when it opens it. As a result, it is not possible to lock individual records. To make datafile sharing over a network a bit safer, you can enable this item on any machine from which the datafile will be shared. The first time a shared datafile is opened from such a machine, it will be locked. Other users who open the same datafile will see that it is locked, and will open it read-only, so they will be able to read it, but will not be able to save changes. (If it is important to save changes to a locked datafile, you can save a copy of the datafile under a different name, by selecting Save As... from the File menu. Those changes can later be extracted from the copy and added to the original datafile at a later time.)
Note that it is necessary to close
and reopen the datafile for changes to this setting to take
effect.
This option will not be available if
the Always open as read-only (don't save changes) option
is enabled. This is because there is no need to lock a file that
you cannot change.
NOTE: The locking mechanism involves the creation of an empty file with the same name as the datafile, but with a .lock file name extension, instead of .id3. When the datafile that created the lock file closes, the lock file is deleted. If a power outage or system crash should leave such a lock file behind, it is a simple matter to drag it to the trash and delete it.
Save
datafile
changes every time I go to a different record
When this option is enabled, iData
Pro will save any changes to the current record whenever you go
to a different record. As with any other way of saving changes,
you will not be able to revert to a previous version of the
datafile once the save has been performed.
Use Custom Setting for Standard
Date sorting
When this option is enabled, iData will check the System Preferences to find the Custom date format, and will try to use that as a basis for datafile sorting by Standard Date and for record selection based on dates.
Don't
show
Print Options dialog before printing
When you print a single record or an
entire datafile, a dialog sheet opens that lets you set the page
margins of the document to be printed, and presents several
options that apply to printing in Basic View format. (See the Datafile
Basics section of the Tutorial for details.)
If you always use the same settings for printing, this option
permits you to turn that dialog off, or to turn it back on if
you change your mind later.
Automatically enable recognizable
links
When this option is enabled,
whenever a record is shown, iData Pro will scan the Freeform
Text Area for standard URL-style Web, file, or e-mail addresses,
and will turn them into clickable links to the addresses that
they represent. The same will be done with those kinds of
addresses in fields whenever a field containing one is made
active by clicking in it. Here are some typical recognizable
URL-style addresses:
file://Macintosh%20HD/FlightInfo.rtf
support@idata3.com
If this option is disabled, such links will not be automatically enabled, but links that have already been enabled will remain enabled. To learn how to disable existing links, see Remove Links in Selected Text.
Even with this option disabled, there are several ways to explicitly add links to the Freeform Text Area. To learn about these methods, see the Help pages on creating links, activating existing recognizable links, and inserting links to files or folders.
Warn when datafile size is greater than 1 GB
When this option is enabled, if you
open a datafile that is larger than 1 gigabyte, a warning alert
will come up. The alert will specify "greater than 1 GB" or
"greater than 1.5 GB".
In addition, datafiles greater than 1.5 GB in size are not only extremely slow to open in save, but can actually slow down all other apps that are running concurrently with iData Pro.
If you see the warning alert, you should consider splitting the datafile into two or more smaller datafiles. See Split Datafile to learn how to do this.
When printing one or more records in Basic View format:
Print Record Numbers
If this option is
enabled (checked), the words "Record Number:", followed by the
record number and a blank line, will be printed at the beginning
of each record.
Don't
Print Empty Fields
If this option is
enabled, only fields that have some content will be printed.
This option is not available when printing freeform datafiles.
Print Bold
Field Names
If this option is enabled, field names will be printed in a bold version of the field name font--but only if a bold version of that font exists. This option is not available when printing freeform datafiles.
Set new password for this Datafile:This option allows you to set a password for the current datafile.
NOTE: Since datafiles can be opened in text editors or word processors, such as TextEdit, this option is not intended to provide security protection. Rather, it is intended as a sort of "admin assistant", allowing an administrator to limit the editing of shared datafiles to specific individuals.
With a password set, anyone who opens the datafile must either enter the password or open the datafile in read-only mode.
In read-only mode, changes to the datafile (including changes to datafile settings) cannot be saved.
To set a password:
1. Type the password into the Enter password: field.
2. Type the same password into the Re-enter password: field.
3. Click the Set button. (If the passwords entered in the two fields do not match, there will be a beep and both fields will be cleared.)
4. Be sure to click the Save button once all setting changes have been made.
Note: If the passwords entered in the two fields match and you click the Save button without having clicked the Set button, the following sheet will appear to give you a chance to go ahead and set the entered password. If you are unsure of what you've done, simply click the Do Not Set button. You can always go through the process again.

To remove a password:
1. Click the Remove Password for this Datafile button.
2. Be sure to click the Save button once all setting changes have been made.
With a password set, the following sheet will open each time the datafile is opened:

Enter the password for this datafile and click the Okay button. If an incorrect password is entered, there will be a beep and the text in the field (which appears as a string of bullets ••••) will be highlighted so that you can try again.
If you don't know the password, just click the Open Read-Only button.
Set Freeform Text Area Background Color
The default value for the background color of the Freeform Text Area is white, but you can select a different background color.
Click on the color well and the Color Picker window will come up.
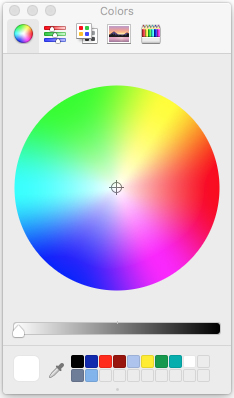
When you select a color, it will show up in the color well.
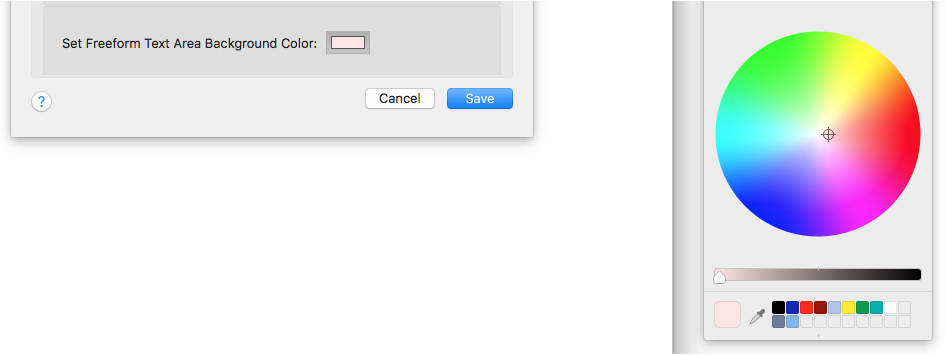
Note that a color may appear darker than expected when it fills the Freeform Text Area, but you can modify it as often as needed.
You can close the Color Picker window when you no longer need it.
Also note that if you bring up the Datafile Settings sheet with the Color Picker still open, the color well may still be active, in which case, it will have a dark gray frame. If it is not active, it will have a medium gray frame. This can get a little confusing if you're going back and forth, so if you change the color in the Color Picker and the color well doesn't change, just click the color well again.
Always Settings: (return to top)
1. With a datafile open, select Datafile Settings... from the File menu. (Or, type command-option-comma.)2. In the dialog that comes up, select the Always tab. It should look like this:
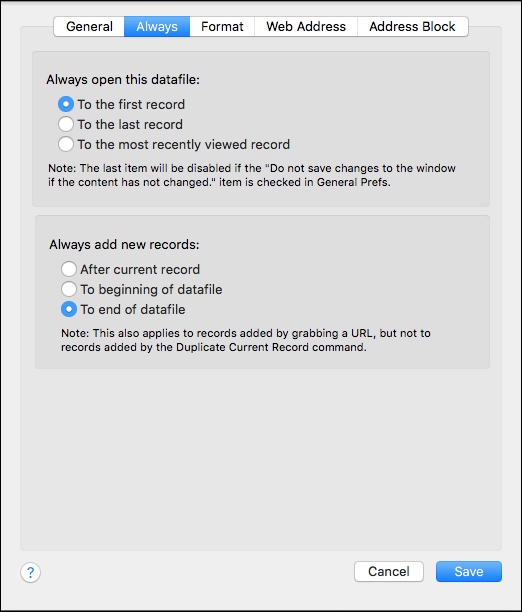
What the Always Settings Mean
Always open this datafile:This section has three radio buttons. Select the one you want.
To the first record
Enable this option to have the datafile always open to the first record in the datafile.
To the last record
Enable this option to have the datafile always open to the last record in the datafile.
To the most recently viewed record
Enable this option to have the datafile always open to the record that you were viewing when the datafile was closed the last time.
NOTE: If you have enabled the Do not save changes to the window if the content has not changed option in General preferences, this last item will be disabled.
Always
add
new records:
This section has three radio
buttons. Select the one you want.
After
current record
If this option is
selected, new records will be added following the current
record.
To
beginning of datafile
If this option is
selected, new records will be added at the beginning of the
datafile.
To
end of datafile
If this option is
selected, new records will be added at the end of the datafile.
Format Settings: (return to top)
1. With a datafile open, select Datafile Settings...
from the File menu. (Or, type command-option-comma.)
2. In the dialog that comes up,
select the Format tab. It should look like this:
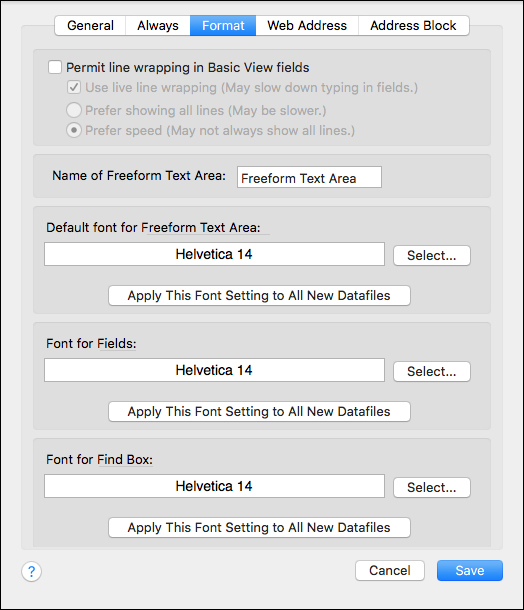
3. Once you've made your settings, click the Save button to make those changes
take effect.
What the Format Settings Mean
Permit line wrapping in Basic View
fields
Sometimes a field may contain too
much text to display it all on a single line at a reasonable
window width. Enable this option to have iData Pro expand each
Basic View fields vertically as much as is needed to show all
the data in that field. Because this requires constant
processing of all the data in all fields, enabling this setting
can make iData somewhat less responsive when typing, or when
resizing windows, so we recommend that this setting be turned on
only for datafiles that really require it.
This setting has two subbordinate
settings that are available only when it is turned on:
Use live line wrapping
When this option
is enabled, iData recalculates the amount of space required as
each character is typed. This allows iData to resize the current
field as soon as necessary. This can be very useful, but it has
the disadvantage of being particularly slow--especially on older
machines. An alternative is to leave this option disabled, and
to periodically have iData recalculate field height requirements
by typing command-option-U,
or by selecting Update Line
Wrapping under the View
menu. This approach should work well most of the time.
iData will
automatically update field sizes whenever you go to a new
record, resize the datafile window, or move the slider bar that
separates the Field Area from the Freeform Text Area.
Prefer showing all lines
Prefer speed
Select the first
of these options to have iData use a calculation method that
will tend to always show all lines when text is wrapped in
fields. This method can be a bit slow when typing or resizing
the datafile window, but is generally the most satisfying.
Occasionally, an extra blank line will be added and, very
rarely, the last line may not be displayed. These vary with the
width of the field, and resizing the datafile window
horizontally may correct the problem.
Select the second
of these options when speed of redrawing the window is more
critical than seeing all of the text. With this setting, it is
common for the height of a field to be one line too short to
show all of the text in that field. This problem occurs mostly
when there are more than two lines of text in the fields. As a
rule, we do not recommend this setting, but have provided it for
use in special situations.
Name of Freeform Text Area
The default name of the Freeform Text Area is Freeform Text Area. (Clever, huh?) The one exception is that imported email datafiles will use the name Message for that area. This name appears over the last column in List View, when printing Basic View records, and when exporting a datafile as a text file. You may change it to anything you like.
Default Font for Freeform Text Area
This is the font (typeface and point size) that will be used for the Freeform Text Area of new records. Of course, you can change the font of any text in the Freeform Text Area at any time. Click the Select... button to bring up the Font Panel, and make any changes there. The changes will be reflected in the text field to the left of the Select... button.
Note that changes to this setting will not apply retroactively to existing records.
Apply This Font Setting to All New Datafiles
Click this button
to have the Freeform Text Area font setting for the current
datafile become the universal default for all new datafiles.
Since this applies to all datafiles, it is technically a
"preference" rather than a "datafile setting", but this seemed
like a convenient place to add this option.
Font for Fields
This is the font (typeface and point size) that will be used for the Fields Area in the current datafile. Click the Select... button to bring up the Font Panel, and make any changes there. The changes will be reflected in the text field to the left of the Select... button.
Apply This Font Setting to All New Datafiles
Click this button
to have the Fields Area font setting for the current datafile
become the universal default for all new datafiles. Since this
applies to all datafiles, it is technically a "preference"
rather than a "datafile setting", but this seemed like a
convenient place to add this option.
Font for Find Box
This is the font (typeface and point size) that will be used for the Find Box in the current datafile. Click the Select... button to bring up the Font Panel, and make any changes there. The changes will be reflected in the text field to the left of the Select... button.
Apply This Font Setting to All New Datafiles
Click this button to have the Find Box font setting for the current datafile become the universal default for all new datafiles. Since this applies to all datafiles, it is technically a "preference" rather than a "datafile setting", but this seemed like a convenient place to add this option.Web Address Settings: (return to top)
1. With a datafile open, select Datafile Settings... from the File menu. (Or, type command-option-comma.)
2. In the dialog that comes up, select the Web Address tab. It should look like this:
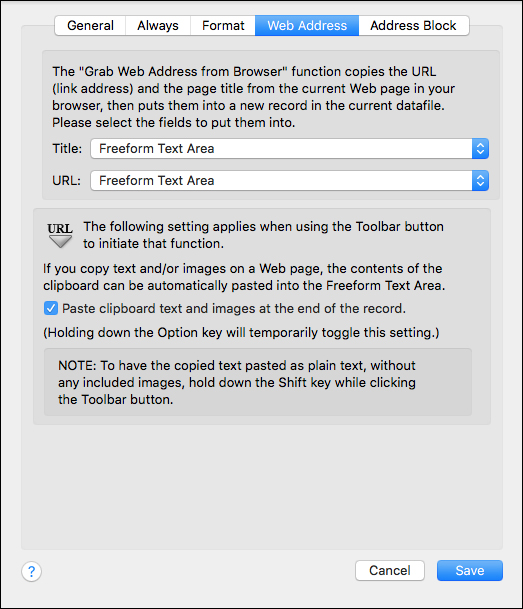
3. Once you've made your settings, click the Save button to make those changes take effect.
What the Web Address Settings Mean
Title
Select the field where you would like the title of a browser
page to go when using the Grab Web Address function. Since there
is no way to predict what fields, if any, a new datafile will
have, the default for this item is the Freeform Text Area.
URL
Select the field where you would like the URL (link address) of a browser page to go when using the Grab Web Address function. Since there is no way to predict what fields, As with the Title item, the default for this item is the Freeform Text Area.
Paste clipboard text and images at the end of the record.
Enable this checkbox to have iData Pro automatically paste any text and images from the clipboard at the end of the Freeform Text Area when using the Grab Web Address function. If the Title and URL are also going into the Freeform Text Area, material from the clipboard will be pasted below that.
Whichever setting you select for
this, if you hold down the option key when selecting the Grab Web
Address function, it will cause iData to do the opposite of
this setting.
Address Block Settings: (return to top)
The Address Block settings are used to extract address data from a datafile. This address data may be used in two different ways. The most common use is in the printing of labels and envelopes from within iData Pro. Another use is in the Copy Address Block function under the Edit menu.
These settings are set individually for each datafile, since the location and arrangement of the address data may vary from file to file. The default setting is to use addresses in the Freeform Text Area, starting at line number 1, and selecting text up to the first blank line.
Note: In all cases, all empty lines will be removed from the final address block text. If you wish to have a blank line appear in an address block, you must add a space character to that line.
Setting Up the Address Block:
1. With a datafile open, select Datafile Settings... from the File menu. (Or, type command-option-comma.)
2. In the dialog that comes up, select the Address Block tab.
3. Select a radio button for the part of the datafile that contains the address block. The options are Use addresses in freeform text area: and Use addresses in fields:.
4. Set up the address block details, as explained below.

Getting an Address Block from the Freeform Text Area
iData Pro can extract an address block from the Freeform Text Area. This is, of course, the only option for datafiles that have no fields. However, it may also be of use when addresses are added to the Freeform Text Area of a datafile that has fields that are not address-related.
In freeform text, the address block text is expected to be a block of contiguous lines of text. There are two options for finding the beginning of the address block, and two more for finding the end of it.
Begin by selecting the Use addresses in freeform text area: radio button.
Finding the Beginning of a Freeform Address Block
The options for finding the beginning of the address block in the Freeform Text Area are:
1. Start at line number: Pick this option if the addresses in your datafile all start on the same line. The most common case will be that each address starts on the first line of its record. A typical exception might be a datafile in which a phone number, or other data was on the first line, with the addresses all starting on line 3.
If you are just starting a freeform datafile that contains addresses, we suggest that you always start each record with the address. It will make things easier for you in the long run.
After selecting this option, type the line number in the text field at the right of the radio button.
2. Start on line after: If you have an existing datafile that has addresses located on different lines in different records, and if it is too difficult to change this, you have another option. You can place one or two special characters on the line above each address, and have iData Pro take the line following that character as the starting line of the address block.
After selecting this option, type the special character(s) in the text field at the right of the radio button. You should select a string of characters that is not used anywhere else in any of the records in that datafile. The default character string is ~% (tilde percent). If you want to use a single character, a good choice might be the ¬ (logical NOT), which can be typed by holding down the option key and typing l (lowercase L).
Next, add the special character(s) on a separate line, immediately above each address, so that a typical record might look like this:
1/32"-walled titanium tubing is available with outer diameters of 1/2", 5/8", and 3/4"This could be nice for whistles, since it's strong, doesn't corrode, and can be treated to produce a kind of opalescent finish.
The Delrin mouthpieces and fipples that we use with brass tubing should work just fine with titanium.
06/10/05 - talked to Bob Smith at Smith Metals, and he says we can get a 6' sample of the 1/2" stuff by sending a business
card and a brief description of our plans to:
~%
Smith Metals, Inc.
ATTN: Bob Smith
123 Main Street
Bigville, VA 54321-1234
Once we see how it works, we can make a decision about whether we want to start using it. Bob can also provide details
about what is needed to produce the opalescent finish.
Phone: \111-555-4321\
Office hours: 9:00-12:00 and 1:00-5:00 EST
The Start on line after: option lets you leave the address where it is,
instead of moving it to the top of the record. However, this
setting applies to all records in the datafile, so you must be
consistent in using it.
Finding the End of a Freeform Address Block
The options for finding the end of of the address block in the Freeform Text Area are:
1. Select up to first blank line: Pick this option to have iData
Pro select all text up to the first blank line following the
start of the address block text. This is probably the most
useful option. The example immediately above shows an example
of the kind of text that this option would work well with.
Note that it is not necessary to add a blank line after an address block if it is the last item in a record. The blank line is only needed to separate the address block from any following text.
2. Select only [ ] lines Use this option to have iData Pro always pick the same number of lines, regardless of what follows them. This is probably not particularly useful for actual mailing addresses, but may be useful for producing labels containing information other than addresses.
After selecting this option, type in the desired number of lines.
Note that it is okay if the address text contains fewer lines than specified.
Getting an Address Block from Fields
Begin by selecting the Use addresses in fields: radio button.
The list on the left contains field
names for this datafile. Click once on a field name, and it will
be inserted in the area at the left. Field names that are
inserted in this manner will be a dark maroon color. (The
example uses the fields in Sample Field Datafile.)
Type spaces, returns, and
punctuation to properly format the field names into an address. If you wish, you can also type text
into the address block such as "Attn: " or "For the eyes only of
". This text would appear in the same relative position in every
address. Text that is typed in will be black. If you type in a
field name (e.g. "Address") it will appear in black, and it will
show up as that word on every label or envelope, not as the
content of the Address field.
In the illustration above, the comma
after "City" and the two spaces after "State", along with the
returns at the end of each line, were typed in. Note that the
comma is black, while the field names are all maroon.
Lines that contain either a single space or a comma followed by a single space will also be removed.
If you wish to force a blank line in any position, just type two or more spaces on that line.
(return to top)