Search Options
iData provides several options for quick searches through the Find
box. Just below the Toolbar is a text box with three buttons at the left. This is the Find Box. The Find Box is where you type in your search target (the text that you want to find in one or more records).
There are two ways that iData looks for text. You can switch between the two methods by holding down the option key while clicking on the Search Option Button (the magnifying glass icon) to the left of the Find box.
Searching always starts at the current field or text selection in the current record.
Classic iData-style Search

The classic iData method of searching is to treat all the text in the Find box as one item. Spaces are considered spaces so that Douglas Adams would only find records that contains Douglas Adams it would not find Douglas A. Adams nor would it find Adams Douglas.
If you want to find all of those instances containing both Douglas and Adams (a "multi-target search") you would enter Douglas&&Adams. In search parlance && would be referred to as a "logical AND". There is a button in the toolbar that will add to the Find box at the current cursor position. (Note that you should not include spaces on either side of the &&, unless you want them included in the search.
Classical iData-style search is different than you may be used to with internet search engines like Google®.
Internet-style Search

Internet search engines such as Google treat a space as a logical AND. So that entering Douglas Adams would find Douglas Adams, Douglas A. Adams, and Adams Douglas.
If you only wanted to find Douglas Adams (a "single-target search") you would have to enclose it in straight quotation marks in the Find box like this: "Douglas Adams".
One difference between iData searches and most search engine searches is that iData allows non-alphanumeric characters to be included in searches, rather than treating them the same as spaces.
Single-Target vs. Multi-Target Searches
When searching for single targets, one instance of the found target is shown after each search. It doesn't matter whether the target is found in a field or in the Freeform Text Area. Repeating a search will find the next instance of the target, if there is one, within the current record, or will start searching again from the next record (or from the previous record when performing a reverse search).
When searching for multiple targets, results may vary depending on the configuration of the datafile, and of the record in which the targets are found. As a general rule, only one field can display a found target, while an instance of each targe that is found within the Freeform Text Area will be highlighted. When no fields are involved, the same search might find more than one instance of a set of targets.
Find or Select Results
When you use Find in most word processors it will take you to the first instance of the text you are searching for. The Find Again will take you to the next instance, and so on. This is the method that iData uses when the magnifying glass icon is surrounded by triangular arrows.


Clicking on the right-pointing arrow will take you to the next instance of your search text. Clicking on the left-pointing arrow will take you to the previous instance.
Some databases applications handle searches differently than word processors. They respond to a Find command by hiding all records that do not contain the search text. This is done in iData when the icons around the magnifying glass are squares made up of horizontal lines.


You can switch between these two methods simply by clicking on the magnifying glass icon.
For more complex record selection, use the various items in the Select menu.
Case-sensitive vs. Case-insensitive Searches
iData can be set to ignore whether a character is uppercase or
lowercase. Or, it can be set to only find text where the case of
each character matches that of the search text.You can tell when it is set to be case-sensitive by a small "A" being displayed under the magnifying glass.


When there is no "A" the search will ignore a character's case.


Toggle between case-sensitive and insensitive by Control-clicking the magnifying glass icon.
The Appearance of Found Text
Freeform DatafilesiData starts a new forward search at the current cursor position (or at the end of the currently selected block of text).
When the target is found, the target is selected and the color of the selected text is temporarily changed. The default color is red, but this can be changed in the General pane of the Preferences window.
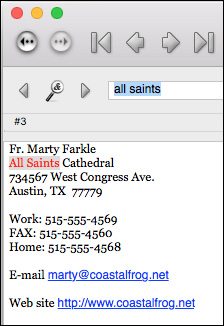
When there are multiple search targets, one instance of each will be colored.
Any action that results in the target text being deselected (such as clicking in the Freeform Text Area, or performing another search) will cause the target text to revert to its original color.
A new reverse search will begin at the end of the current record (or at the beginning of the currently selected block of text).
Field-based Datafiles
If a field is currently active, iData starts a new forward search with that field. If the Freeform Text Area is active, the search starts at the current cursor position (or at the end of the currently selected block of text).
If the search target is found in the Freeform text area, the target is selected and the color of the selected text is temporarily changed, as shown above.
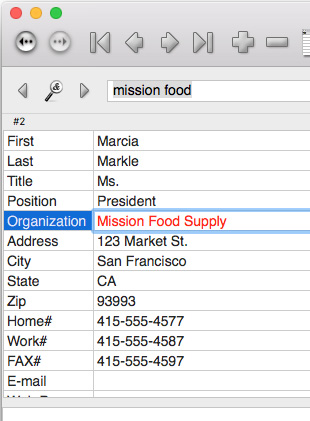
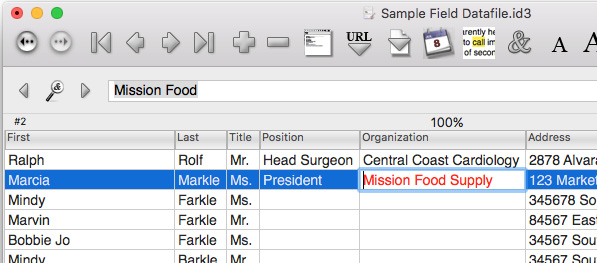
If the search target is found in a field, that field is activated and the color of the field text is changed. (Even if more than one target is found in fields in a record, only one of those fields can be activated.)
Clicking and editing the target field will not affect the text color, but when the field is deselected, it will revert to black.
Here's how this looks in Basic View:
And in List View:
Find Menu Choices
Find Next
If the Find Box is empty, command-G will take you to the next record. If you put text in the Find Box, command-G will take you to the first instance of that text in the datafile. command-G is equivalent to clicking the Forward Find Button (right-pointing triangle). If the Find Box is active, the Return key or Enter key will function similarly to command-G.
Find Next starts at the beginning of the current record and searches forward through the datafile. It searches both fields and Freeform Text Area. When it comes to the end the end of the datafile it will wrap to the beginning and continue searching. The search never stops, it will go around and around.
If the text you are searching for does not exist in the datafile, you will hear a System beep.
Reverse Find
You can search through a datafile backwards, if you wish. The left-pointing triangle near the Find Box is the Reverse Find Button. The keyboard equivalent is command-shift-G. Reverse find will start at the end of the current record and search backwards through the datafile.
iData starts a new reverse search at
the end of the current record.
Skip Record Then Find
If the current record has many instances of the search text, and you know this is not the record you want, you can use the option key to continue the search at the beginning of the next record. Hold down the option key and click the Forward Find Button. Or, type command-option-G for a forward search.
Skip Record Then Reverse Find
If the current record has many instances of the search text, and you know this is not the record you want, you can use the shift and option keys to continue the search at the end of the previous record. Hold down the option key and click the Reverse Find Button. Or, type command-option-shift-G.
Find and Highlight
Normally, when text is found in the Freeform Text Area, it will be highlighted, but not active. The Find Box remains active. This is to avoid the common mistake of wiping out the found text with an accidental keystroke. It also keeps the Find Box active for another search.
If you want to highlight and activate the found text, hold the control key down when clicking the forward Find button. Or, type control-command-G. The found text will be highlighted and active so you can copy, cut, or type over it.
Reverse Find and Highlight
If you want to highlight and
activate the found text in a reverse search, hold the control key down when clicking the
Reverse Find Button. Or, type control-command-shift-G. The found text will be
highlighted and active so you can copy, cut, or type over it.
Find and Replace...
Although the iData Find Box and Find Button combination are great for quick searches, sometimes we need more advanced options. These are provided by the Find and Replace function.
There are two points that may not be obvious at first glance:
1. Only selected records will be affected by the Find and Replace operations. If you want to exclude certain records from these operations, you can use the various options under the Select menu to deselect those records.
2. The Find and Replace function works only with the frontmost datafile. Logically, this dialog should have been a sheet, attached to its datafile window. Unfortunately, it would then have covered part of the text area of the datafile, which could sometimes make it difficult to decide whether or not to replace found text. Although the name of the datafile in which operations will take place is shown in the Find and Replace window, it may not always update immediately when clicking around and switching between windows, so before replacing any text, please be sure that you are working with the datafile that you think you are working with.
To use the Find and Replace function:
1. With a datafile open, select Find and Replace... from the Find sub-menu, under the Edit menu, or type control-command-F. This will bring up the following window:
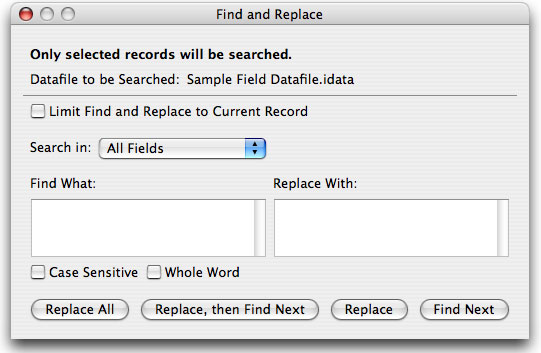
2. In the Search In: popup menu, select All Fields, a field name, or the Freeform Text Area.
3. Type or paste the text to be found into the Find What: text field. (Note that you can enter tabs and returns in this field, so you cannot use the tab key alone to move between this field and the Replace With: field. However, you can use control-tab to move between them.)
4. If you wish to replace that text with different text, enter the replacement text in the Replace With: text field. (Note that you can enter tabs and returns in this field, too.)
5. If you want your search to match uppercase and lowercase characters exactly as you enter them in the Find What: field, enable the Case Sensitive checkbox. If this checkbox is not enabled, uppercase and lowercase versions of a character will be treated as the same character. With this checkbox enabled, a search for bob will not find Bob, and vice versa.
6. If you want your find only whole words, enable the Whole
Word checkbox. With
this checkbox enabled, a search for pot will
not find potato.
7. If you want your
search (and any text replacement) to take place only in the
current record, enable the Limit
Find and Replace to Current Record checkbox.
8. Once all your settings have been made, click one of the buttons at the bottom of the Find and Replace window. Here is what will happen when each of these buttons is clicked:
a. Replace All -- All instances of the text in the Find What: field will be replaced by the text in the Replace With: field, subject to the constraints of the Case Sensitive and Whole Word settings. If there is no text in the Replace With: field, the text in the Find What: field will be deleted (replaced with nothing) wherever it is found.
b. Replace, then Find Next -- If the text in the Find What: field is currently selected in the datafile, it will be replaced by the text in the Replace With: field. Then iData will search for the next instance of the text in the Find What: field, and will select (highlight) it if it finds it.
c. Replace -- If the text in the Find What: field is currently selected in the datafile, it will be replaced by the text in the Replace With: field.
d. Find Next -- iData will search for the next instance of the text in the Find What: field, and will select (highlight) it if it finds it.
Multi-File Find...
The Multi-File Find function permits you to search through groups of datafiles--even datafiles that are not open.
When searching in unopened datafiles, iData will open them for searching, and will close them again if the target text is not found. Once a datafile has been opened to show found text, it will remain open until you close it.
To use the Multi-File Find function:
1. Select Multi-File Find... from the Find sub-menu under the Edit menu or type control-command-M. This will bring up the following window:
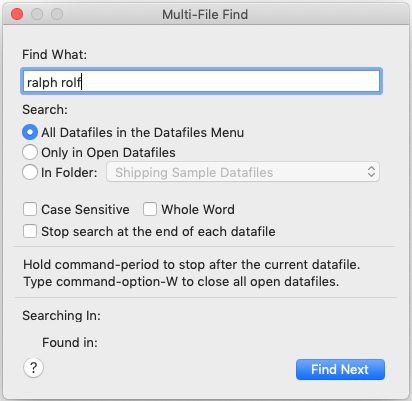
2. Type the text to search for (the target text ) in the Find What: text field.
3. Choose one of the Search: radio buttons. Here is what these buttons mean:
a. All Datafiles in the Datafiles Menu -- iData will begin searching with the first datafile in the Datafiles menu. It will go through the datafiles in that menu, and any sub-menus, until it either finds the target text or exhausts all possibilities. If it finds the target text, it will bring the datafile containing it forward and select that instance of the text. If you continue searching with this option selected, the search will take up from that point.
b. Only in Open Datafiles -- iData will search only in open datafiles. It will search in the order in which the various datafiles were opened. If you continue searching with this option selected, the search will take up from that point.
c. In Folder: -- If you select this option, you will then be able to select one of the sub-folders in the iData Pro Datafiles folder (which is represented by a sub-menu in the Datafiles menu).
4. If you want your search to match uppercase and lowercase characters exactly as you enter them in the Find What: field, enable the Case Sensitive checkbox. If this checkbox is not enabled, uppercase and lowercase versions of a character will be treated as the same character. With this checkbox enabled, a search for bob will not find Bob, and vice versa.
5. If you want your search to find only whole words, enable the Whole Word checkbox. With this checkbox enabled, a search for pot will not find potato.
6. If you are searching through
lots of large datafiles, you should probably enable the Stop
search at the end of each datafile checkbox, to give you a chance
to abort the search without waiting for all of
the datafiles to be searched. This is a particularly good idea
if you are searching for some text that has a low chance of
occurring in any datafile.
7. Once all your settings have been made, click the Find Next button. If the target text is found, but you want to continue the search, just click the Find Next button again, and the search will continue from where it left off.
8. As each datafile is opened, the datafile
name will be displayed in the Searching in: text
field.
9. If the target text is found, the datafile containing it will be brought up and the text will be selected (highlighted). However, the Multi-File Find window will continue to be the frontmost window. If the Multi-File Find window is completely obscured by the datafile window, just type command-option M to bring it forward again.
10. When all datafiles have been search, the Searching
in: text field will show <<Search
Completed>>. At that point, you can click the Find
Next button to restart the search from the beginning, if
you wish.
11. Whenever the search is halted, you can change the Find
What: text, the Search: selection, the Case
Sensitive checkbox, the Whole Word checkbox,
and/or the Stop search at the end of each datafile
checkbox. Changing any of these settings will cause the search
to begin again with the first eligible datafile.
Copy Selection to the Find Box
If there is some text in a record that you want to use to search other records, simply highlight that text and select Copy Selection to Find Box in the Find sub-menu, under the Edit menu, or type command-F. This will put a copy of the text in the Find Box without using the clipboard.
Insert && in Find Box
This item is only used with Classic
iData-style searching. If you want to find a record that has
both Smith and Texas in a
datafile with lots of Smiths and lots of Texas addresses, you
can search on "Smith&&Texas". Multiple search elements
are separated by &&.To insert that && at the
current text entry point in the Find Box, you can select the
menu command Edit: Find: Insert && in Find
Box (or type command-&),
click the &
toolbar button, or just type &&. There is no limit to
how many && can be used. So, you could search for
something like Smith&&Texas&&bluegrass&&fiddle&&jalapeño
chili.
NOTE: You should not include spaces on
either side of the &&, unless you want those spaces to
be included in the search.