Sorting Basics
All datafiles can be sorted on the basis of the dates when the various records were created, or the dates when they were last modified.
In all cases, the default sort order is ascending. In alphabetic sorts, ascending means sorted in alphabetical order. In
numeric sorts, it means sorted in numeric order. In date sorts, it
means sorted
from earliest to latest. It is also possible to sort in reverse, or descending order.
However, when sorting on the basis of
record content, freeform datafiles and field-based datafiles must be
handled differently.
The
next section, below, explains the Sort Dialog for freeform datafiles.
To jump to the section on field-based datafiles, click here. It is also possible to perform a sort without bringing up a Sort
Dialog.
Using the Freeform Sort Dialog
Freeform datafile records can be analyzed
in terms of the entire record, or in terms of an address block that
you specify for that datafile.
iData Pro can attempt to find personal
names or U.S. and
Canadian postal codes, or you can specify a particular word on a
particular line to be used as the sort key. This requires that you be
consistent in how you enter the data on which you will be sorting.
The
most common reason for sorting freeform data is to arrange records in
order by names or postal codes in address blocks. If you are consistent
in how you lay out your address blocks, sorting by names or postal
codes should work pretty well.
To sort a datafile:
1. Open the datafile in iData Pro.
2. Select Sort Datafile... under the File menu (or type option-command-S).
This will bring up the Freeform Sort Dialog with the Name tab selected by default. Each
of the tabs will be explained below:
The Name
tab
The Word
on Line tab
The Other
tab (for sorting by Whole Record, Created Date, Modified Date, or
Postal Codes)
iData Pro lets you specify the line within each record's text where it should look for names. It will eliminate any prefixed titles, such as "Miss" or "Dr.", and suffixed titles, such as "Jr." or "Ph.D.", then it will treat the last word on the specified line as a last name, and the first word as a first name. It will sort by last names, and within each last name group by first names.
NOTE: Recognizing multi-word names, such as "Mary Ann" or "De La Rosa", is too difficult for a simple little application like iData Pro, but you can force it to treat multiple words as single words by separating them by the option-space character, instead of the usual space character. To change an existing space to an option-space, just select it and hold down the option key while typing a space. It won't look any different, but it will sort differently.
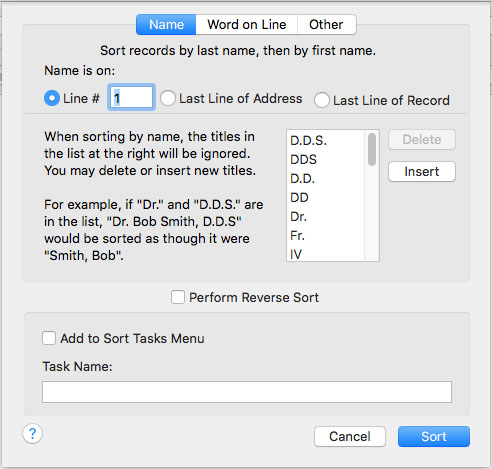
(1) Select the desired radio button. If you select the Line # button, type in the number of the line that will contain the name in each record. It will probably be most common that names will be on the first line. If you have some records that have names on the first line and some that have them on the second line, they will not sort correctly. iData Pro cannot recognize names by content -- only by position within the record.
(2) If you have not done so before, scroll through the list of titles and make sure that it contains all the titles that are likely to appear in your datafile. You can modify the list as follows:
(a) To insert a new title, click on an existing title that the new title is to go after. It will be highlighted, and the Delete button will become active.
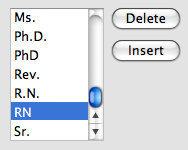
NOTE: When adding a title that contains part of a longer title, make sure to put the short one after the longer one.
Otherwise, the longer title will never be removed correctly before sorting. This is why the default list
has "D.D" after "D.D.S.", instead of before it.
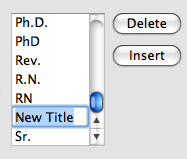
(b) Click the Insert button. A new entry, called "New Title" will appear with its text highlighted.
(c) Type in the actual new title that you want to add. ("Sen." in the example below.)
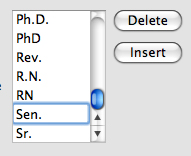
(d) Finally, type the return key. This will finalize your entry, and it will be highlighted. (If you do not perform this step, and do not click on any other title in the list, your new title may not be retained.)
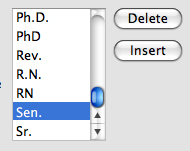
(e) To delete a title from the list, click to highlight it and then click the Delete button. This should rarely be necessary, but may be useful in rearranging items in the list.
(3) If you wish to sort in reverse order, select the Perform Reverse Sort checkbox.
b. Sorting by Word on Line (back to top)
Some kinds of data may best be sorted using the Word on Line method.
Note: For this method to work correctly, be sure that your records do not contain blank lines within the text
where you tell iData Pro to look for the sort key.
(1) Click on the Word on Line tab at the top of the Sort Dialog. This will display the following dialog content:
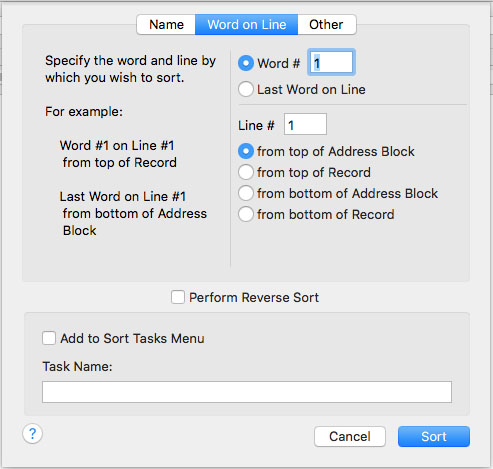
(2) Specify the location of the word that is to be used as the sort key by selecting the Word # radio button and typing a word number, or by selecting the Last Word on Line radio button.
(3) Type a number into the Line # text field.
(4) Select one of the radio buttons below that. Here is what they mean in combination with the line number:
(a) Select the from top of Address Block radio button if the word to be used for the sort key is always on a specific line counting from the top of the address block -- regardless of whether or not the address block starts at the top of the record.
(b) Select the from top of Record radio button if the word to be used for the sort key is always on a specific line counting from the top of the record.
(c) Select the from bottom of Address Block radio button if the word to be used for the sort key is always on a specific line counting from the bottom of the address block. For example, this selection in combination with Line # 1 will result in the specified word being taken from the last line of the address block.
(d) Select the from bottom of Record radio button if the word to be used for the sort key is always on a specific line counting from the bottom of the record. For example, this selection in combination with Line # 1 will result in the specified word being taken from the last line of the record.
c. Sorting by Other Criteria (back to top)
iData Pro provides four additional sorting options. None of these options are particularly complex, so they are combined in a single tab.
(1) Click on the Other tab in the Sort Dialog. This will display the following dialog content:
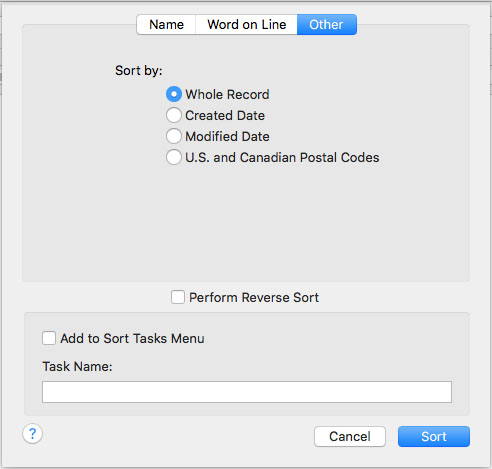
(2) Select the criteria by which you wish to sort. Here's how they work:
(a) Whole Record treats the content of each record as a single text block and sorts alphabetically.
(b) Created Date sorts by the date that each record was created.
(c) Modified Date sorts by the most recent date that each record was modified. In some cases, this will be the same as the Created Date. You can see the Created and Modified Dates for the current record by selecting Show Record Information under the View menu. The Record Information dialog can be moved to one side, and it will be updated automatically as you go from one record to another.
(d) U.S. and Canadian Postal Codes looks at the address block and expects the last item on the last line to be a U.S. ZIP code, a U.S. ZIP+4 code, or a Canadian postal code. However, if the last line consists of "Canada", "U.S.A", "USA", or "United States of America", iData Pro will look for the postal code on the next-to-last line. If you need to sort by postal codes of other countries, you may be able to do so using one of the Word on Line options.
3. If this is a sorting task that you are likely to repeat fairly often for this datafile, you can name it and add it to the Sort Tasks sub-menu, under the Edit menu.
a. Select the Add to Sort Tasks Menu checkbox.
b. In the Task Name: text field, type a name that fits the sort task.
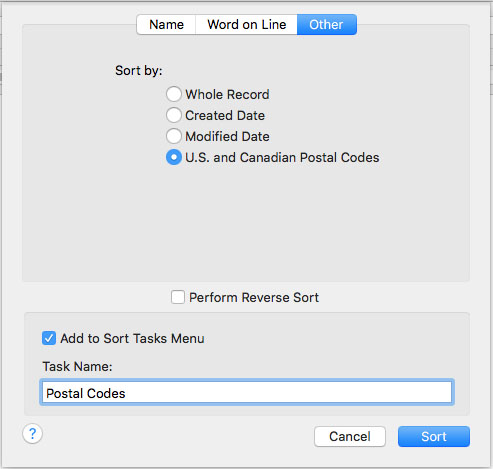
4. Once everything looks correct, click the Sort button.
Using the Field-Based Sort Dialog (back to top)
Because the data in field-based datafiles has a relatively detailed structured, iData Pro can apply that structure to sort records on the basis of the data contained in fields, or in the Freeform Text Area. It can treat that data as alphabetic text, as numbers, or as dates.
When sorting based on the alphabetic content of fields, that content can be treated as case-insensitive text, meaning that uppercase and lowercase characters are treated as being the same, or as case-sensitive text, meaning that uppercase and lowercase characters are sorted separately.
In addition, when treating field content as alphabetic text, it is possible to first sort on the basis of one field, and then to sort each group of identical items in that field on the basis of the content of a second field. This cannot be done when sorting as numbers or as dates.
To sort a datafile:
1. Open the datafile in iData Pro.
2. Select Sort Datafile... under the File menu (or type option-command-S). This will bring up the following dialog.
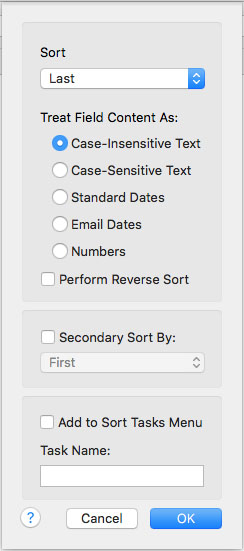
3. In the first (Sort By:) popup menu, select one of the following:
a. A field name ("Last" in the example)
b. The Freeform Text Area item (The actual name of this item may vary.)
c. The Created Date item (each record has a hidden created date)
d. The Modified Date item (each record has a hidden modified date)
4. If you have selected a field name or the Freeform Text Area in the first popup menu, select one of the radio buttons below it. Here is what these buttons mean:
a. Case-insensitive Text -- treat as alphabetic text, treating uppercase and lowercase characters as being the same
b. Case-sensitive Text -- treat as alphabetic text, treating uppercase and lowercase characters as being different
c. Standard Dates --
treat as dates (The routine for identifying dates is pretty flexible.
If you have set a non-standard Custom date format in the International
System Preferences--meaning a date that is not in the same order as the
standard for your System, you may need to enable the Use Custom Setting for Standard Date sorting setting in Datafile Settings.
d. Email Dates -- dates in email messages can be rather strange in format. This option is will handle most dates in email messages.
e. Numbers -- treat as numbers (iData can handle decimal numbers, as well as integers, but this option may not work well for numbers preceded by alphabetic characters.)
5. If you wish to sort in descending order, enable the Perform Reverse Sort checkbox.
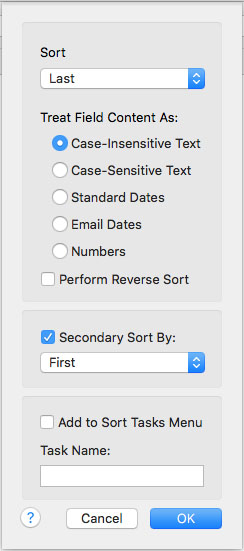
6. If you are sorting as case-insensitive or case-sensitive text, you may also select another field or the Freeform Text Area in the second (Secondary Sort By:) popup menu to perform a secondary sort on the basis of the same kind of content for that field.
7. If this is a sorting task that you are likely to repeat fairly often for this datafile, you can name it and add it to the Sort Tasks sub-menu, under the Edit menu.
a. Select the Add to Sort Tasks Menu checkbox.
b. In the Task Name: text field, type a name that fits the sort task.
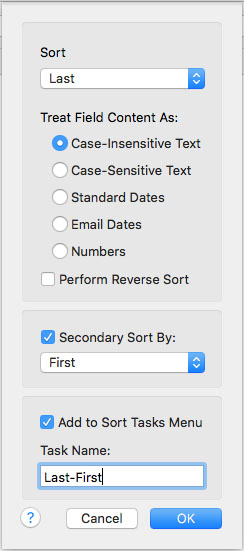
8. Once everything looks correct, click the OK button.
Sorting Without the Sort Dialog (back to top)
In addition to the more complete set of sorting options available in the Sort dialog, there is a faster way of performing a simple sort in List View.1. In List View, hold down the control key while clicking in a column (but not in a column header, and not in an active field). The following contextual menu will appear:
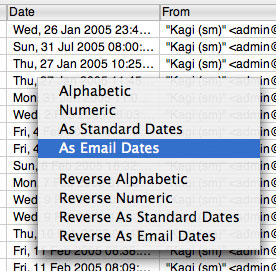
2. Select an option in the menu. When you release the mouse button with one of the menu items selected, the datafile will be sorted
Note 1: Since freeform datafiles are always in List View, this works with them, too. However, it is not as useful as the regular Sort Dialog, since it can only sort by the entire content of each record.
Note 2: If you control-click in an active text field, instead of seeing the Sort menu, you will get a menu with text-editing options.