Tutorial Topics
For best results, simply read this page once from beginning to end--especially if you are new to iData Pro. Then read it again and follow any external links when you need to learn more details.NOTE: This tutorial includes links to more detailed topics. To return to this page after viewing them, use the back arrow
 in
the
Help Viewer window.
in
the
Help Viewer window.The History of iData Pro
How Do the Various Versions Relate to Each Other?
Entering Your Serial Number
iData Pro File Types
File Locations
iData Pro Preferences
Opening Your QuickDEX, InfoGenie, and Older iData Files in iData Pro
The History of iData Pro (back to top)
iData Pro is the latest in a chain of applications that started with Casady & Greene's little desk accessory, QuickDEX. QuickDEX was designed as an on-screen Rolodex emulation. Each record appeared as a card-sized block of plain unstyled text. Customers requested more room for data, and the next version, QuickDEX II, replaced those fixed-size windows with resizable, scrollable windows. A separate application, PrintDEX, was created to permit the printing of labels and envelopes, and the combination was sold as Super QuickDEX.QuickDEX II was actually too large to be a desk accessory and required some tricks with memory to work at all. As customers requested new features, and as Apple started on the path to eliminating the desk accessory format, it was decided that QuickDEX III would be a standard application, and work on this began in 1995. For various reasons, the new version was named InfoGenie, rather than QuickDEX III.
Label and envelope printing capabilities were added to InfoGenie itself, so there was no need for PrintDEX as a separate application. One of the features that was often requested was some kind of field structure. However, many (probably most) QuickDEX II users really liked the freeform record format, and as we began designing InfoGenie, it was decided that the freeform text area would be the core of each record, with fields as options. This approach has been continued and improved up through iData Pro.
With the advent of Mac OS X, InfoGenie became iData Pro, and text formatting and image insertion capabilities were greatly improved. iData Pro 1.0 was based on Carbon features and some OS X features were not readily available.
In 2002, Mike Wright purchased the publishing rights to InfoGenie and iData Pro, and when Casady & Greene went out of business in 2003, he and Robin Casady, with the help of David Sinclair, began working on the next version. iData 2 was an interim Cocoa-based application that lacked label and envelope printing. Finally, iData Pro 3 added those features back in, along with many others that rely on system capabilities that are easily available only through Cocoa.
We have attempted to design iData Pro in such a way that those who prefer the simplicity of QuickDEX can just ignore most of the advanced features, but those features are there for those who need them.
How Do the Various Versions Relate to Each Other?
If iData Pro version 4 is the first version of iData Pro that you have purchased, the main thing you need to know is that the "Pro" portion of the name was used in version 1, but was dropped in versions 2 and 3 (thus, "iData 2" and "iData 3"). With the advent of iData Lite, iData Kwik, iData Mobile, and iData Mobile Plus, it was decided that going back to "iData Pro" would make it easier for everyone to know which version was being discussed at any time.
iData Pro 1, iData Pro 2, and iData Pro 3 all had different datafile formats, so the file name extensions are different for each format -- .id1 or .ID for iData Pro 1, .idata for iData Pro 2, and .id3 for iData Pro 3. When customers moved up to iData Pro 3, it was necessary for them to import earlier datafile versions. However, iData Pro 3 and iData Pro 4 use the same datafile format, so iData Pro 4 datafiles also have the .id3 file name extension.
In the same way, iData Pro 1 datafiles were stored in an iData Datafiles Folder, iData 2 datafiles in an iData 2 Datafiles Folder, and iData 3 datafiles in an iData 3 Datafiles folder.
iData Pro 4 ships with sample datafiles in an iData Pro Datafiles folder, but users of iData 3 may continue to use their iData 3 Datafiles folder. However, you may change the name of the folder to whatever you like.
We plan on using the term "iData Pro Datafiles folder" in the User Guide, but you may occasionally see "iData 3 Datafiles folder".
Entering Your Serial Number (back to top)
When you purchase iData Pro, you will receive an email entitled "Thanks for your purchase" from Kagi(SM). That message will include your iData Pro serial number. (iData Pro 4 serial numbers start with ID40-, followed by three groups of four digits, separated by hyphens.)After purchasing an iData Pro serial number, if you have run iData Pro before (as a demo, for instance), you may not see the serial number entry window right away. In that case, iData provides a way for you to bring it up whenever you like.
To enter your serial number:
1. Select License...
under the iData Pro
menu. This
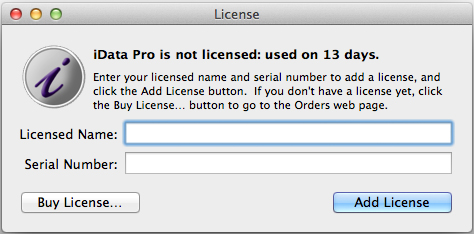
will bring up the following window. The message at the top
will vary
according to how many days iData had been used prior to
bringing up the
License window.

2. Enter your name in the Licensed Name: text field. iData Pro doesn't use your name for any particular purpose, so you can enter anything you like here.
3. Enter your serial number in the Serial Number: text field.
4. Click the Add License
button, and the Entered, Kind, and Licensed Name columns in
the upper
field will display the appropriate information.
If you have any trouble pasting your
serial number into its text field after copying it from an email
message, try just typing it in. It seems that some email styles
may
interfere with copying, and it's also easy to pick up extraneous
space
or return characters that will interfere with iData's processing
of the
serial
number.
Once you have successfully added a license, the License... item under the iData Pro menu will be disabled. If you move the iData Pro application to a different hard drive, or if you reformat your current hard drive and have to reinstall iData Pro, you will have to re-enter your serial number, as well.
As you can see, if you don't already
have
a serial number for iData Pro, you can click the Buy
License... button to go
to the iData Web site to
get one. You can also select iData Orders from the Help menu.
iData Pro File Types (back to top)
iData Pro makes use of three kinds of files:
iData
Pro datafiles
contain your data, organized into records. Datafile file names
end with
.id3. The freeform
text area
of records in this format can have styled text and embedded
images and
sound files.
Our iOS app for the
iPhone and iPad,
iData Mobile, has a slightly different datafile format that
has only
one text style, without embedded images or sound files. iData
Pro can
also open and edit these datafiles, which have the .idm file name extension.
Envelope template files tell iData Pro how to print envelopes in different formats. Envelope template file names end with .ienv.
Label template files tell iData Pro how to print labels in different formats. Label template file names end with .ilabel.
NOTE: The .id3, ienv, and .ilabel
file
name extensions may not show up in the Finder, depending on your
preference settings.
File Locations (back to top)
Datafiles
NOTE: In the past, we've seen that some customers assume that their data is somehow stored inside the iData Pro application itself. This is not the case. The data is stored on your hard drive as datafiles.
If you have used other versions of iData, you may already have some datafiles in an iData 3 Datafiles folder or an iData Pro Datafiles folder. In this case, simply select that folder when it is requested.Otherwise, you may place your datafiles wherever you like. However, iData Pro will ask you to specify the folder that will contain your datafiles. The contents of this folder will be used to create the Datafiles menu.
We recommend that you create an iData Pro Datafiles folder in your Documents folder. Throughout this User Guide, we will use this name to refer to the folder that you select.
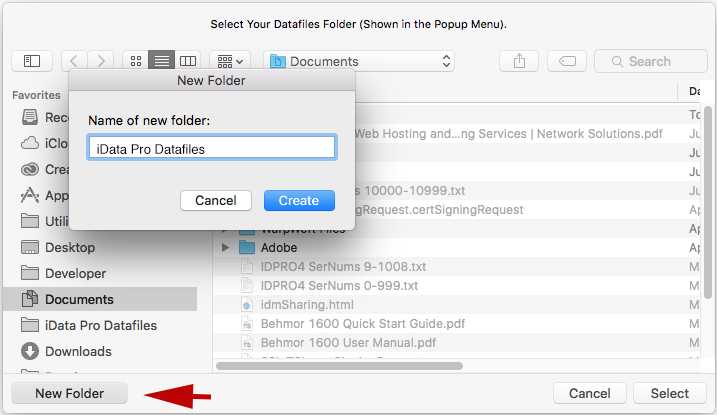
The simplest way to create a new iData Pro Datafiles folder is to do it when iData Pro first asks for its location. Here's how:
1. When the Open dialog first comes up, navigate to the Documents folder.
2. Click the New Folder button in the lower left corner of the Open dialog, type in the folder name, then click the Create button.

You can also create sub-folders within the iData Pro Datafiles Folder, and use those to further organize your datafiles. Sub-folders will show up as sub-menus in the Datafiles menu. Only one level of sub-folders is supported by the Datafiles menu.
If you need to put datafiles in
other
locations, you should make aliases to those datafiles, and then
put
the alias files into the iData
Pro Datafiles
folder.
Templates
iData also uses template files for labels and envelopes. These files must be placed in a templates folder in order for them to show up in the Templates menu.
Everything said above about the datafiles folder goes for the templates -- just replace "Datafiles" with "Templates".
We'll refer to this folder as the iData Pro Templates folder. As with the iData Pro Datafiles folder, you can rename this folder.
iData Pro Preferences (back to top)
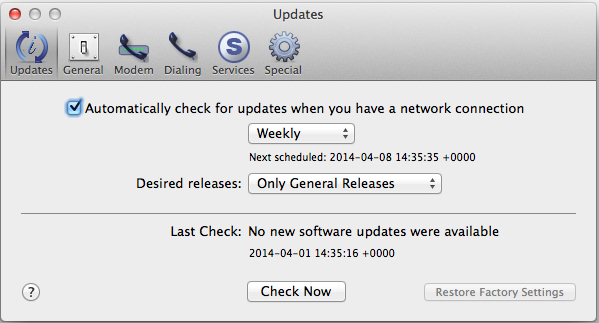
iData Pro is highly customizable. Although the default preferences are generally the most convenient and useful, you may wish to change some of them. To do this:1. Select Preferences... under the iData Pro menu to bring up the iData Pro Preferences dialog.

3. Make any desired changes in the preference settings. To learn about the details of the various preferences, see the following help pages:
Updates
General
Modem
Dialing
Services
Special
Note: In addition to Preferences, which apply to all datafiles, each datafile has its own Datafile Settings, which can be set differently from one datafile to the next.
Opening Your QuickDEX, InfoGenie, and Older iData Files in iData Pro (back to top)
QuickDEX card decks and datafiles from InfoGenie, iData Pro (v. 1.0.x), and iData 2 cannot be opened directly in iData Pro, but must be imported.iData 2 Datafiles
In most cases, the first time you run iData Pro, you will be prompted to import all of your iData 2 datafiles and templates. We recommend that you do this at that time.To import an individual iData 2 datafile at any time, select iData 2 Datafile... in the Import sub-menu, under the File menu. In the Open dialog, select the file to be imported. Once the import is complete, save the new datafile right away.
You can also import an entire folder of iData 2 datafiles in a single operation by selecting iData 2 Datafiles Folder in the Import sub-menu, under the File menu. For details, see the Help page on this topic.
iData Pro 1 Datafiles, InfoGenie Datafiles, and QuickDEX Card
Decks
Just select the appropriate product name from the Import sub-menu, under the File menu. In the Open dialog,
select the file to be imported. Once the import is complete, save
the
new datafile right away.You can also import an entire folder of iData Pro 1 Datafiles in a single operation by selecting iData Datafiles Folder in the Import sub-menu, under the File menu. For details, see the Help page on this topic.